


Notes: Remember your zipper foot!
Lapped Zipper
 Uses: Used for a side seam when you want to have the flap going towards the back to hide the zipper instead of two flaps running down the middle of the zipper. Can also be used for bags.
Notes: These directions are for making a lapped zipper for the left side of a garment (e.g. if you place the zipper going down the left side of a dress, the flap opens from the back side) where side zippers are usually placed on women's clothes. To make one for the right side, just reverse left and right in the directions.
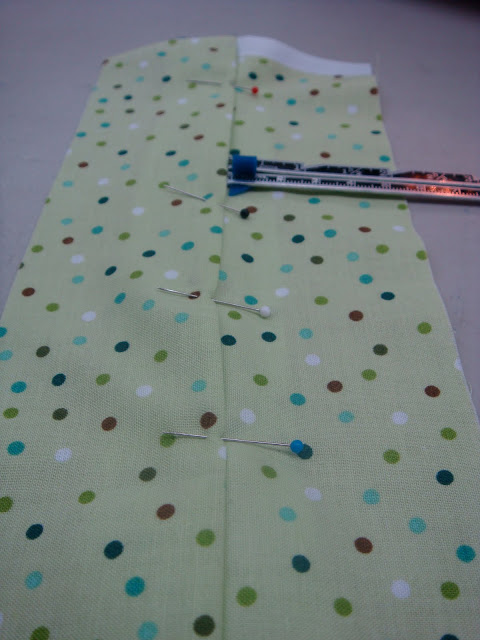
 Step 1: For this zipper, it may be easiest to give yourself a 1" seam allowance (to do this, cut the fabric 3/8" wider for that seam). Place your zipper in position, and mark your fabric at the end of the zipper right at the metal stop tab. Sew your seam (with a 1" margin or 5/8" if you didn't cut the extra allowance) right up to the point you marked, leaving the seam open where the zipper will be. For this picture, the zipper will start right above where that pink seam ends.
 Step 2: Press the seam open. Continue pressing past the seam to where the zipper will be, folding the left side back 1" (this becomes the right hand side when flipped to the front).
 Step 3: Turn the fabric over to the right side. Press the left hand seam allowance under 7/8" (or 1/2" if you used a 5/8" seam allowance).
 Step 4: Pin the zipper under the right side of the seam opening, just as you placed it in step one. Place the zipper's teeth as close as possible to the pressed edge without going over the teeth (if you get too close, the zipper will catch in the fabric when it is being zipped and unzipped). Pin in place.
 Step 5: Sew along the right side using a zipper foot, with your seam as close to the edge as reasonable. I like to start at the bottom and work my way up so that everything gets nice and lined up (although I didn't in this picture). For this side as well as the next, sew with the zipper zipped up, but zip it down when you get to the top so you can get around the zipper pull.
Step 6: Pin the left hand seam over the right hand seam, overlapping by 1/8". Make sure to catch your zipper in the pins.
 Step 7: Starting at the bottom of where the zipper is, sew across the zipper from right to left, and then sew up the left hand side leaving 1/2" margin from the pressed edge (you can mark this with 1/2" tape to make it easier). Use the zipper foot to help guide you along the zipper underneath without sewing over it or sewing too far away.
Check out the tutorial on Burda Style.
Centered Zipper
 Uses: This is your standard zipper seam, generally used for zippers that run down the back or front of a garment. Can also be used in making bags, etc.
 Step 1: Place the zipper in position and mark the spot on the fabric where the metal stopper at the end of the zipper is. Sew a baste stitch along the seam at 5/8" where the zipper will be. When you get to the mark, secure the thread with a backstitch and continue down the rest of the seam with a regular sitch at 5/8" seam allowance (or what the pattern calls for).
 Step 2: Lay the zipper over the basted part of the seam so that the zipper teeth are directly over the seam. To baste in place, you have several options: 1) pin and machine baste, 2) secure with Steam-A-Seam 2 or other fusible tape, 3) secure with Wonder Tape or other wash-away basting tape. I used the fusible tape, but I think the wash-away tape might be your best bet. Whichever way you do it, attach the zipper to the selvadge only.
 Step 3: With the zipper basted in place, flip the fabric over to the right side. Starting at the bottom of the zipper on the right side, sew across the bottom and up the left side, leaving a 1/4" margin (you can use 1/4" tape to help you sew at the right distance). Repeat with the other side, starting at the right and sewing across the bottom and up the left hand side. You do not need to backstitch when you start your stitch because you will be reinforcing it by sewing across the bottom twice. This eliminates bulk and unsightly extra stitches.
Step 4: Rip open the basted stitches down the middle of the seam to reveal your zipper.
Check out the tutorial on Burda Style.
 Uses: You can use this zipper in place of either of the zippers above. It works great pretty much anywhere--garments, pillow cases, etc.--and you may find it easier than the above techniques.


Lapped Zipper

Notes: These directions are for making a lapped zipper for the left side of a garment (e.g. if you place the zipper going down the left side of a dress, the flap opens from the back side) where side zippers are usually placed on women's clothes. To make one for the right side, just reverse left and right in the directions.


Step 6: Pin the left hand seam over the right hand seam, overlapping by 1/8". Make sure to catch your zipper in the pins.

Check out the tutorial on Burda Style.
Centered Zipper


Step 4: Rip open the basted stitches down the middle of the seam to reveal your zipper.
Check out the tutorial on Burda Style.
Invisible Zipper

Notes: You can use a regular zipper foot for this, but a special invisible zipper foot makes it easier. Also, if you are replacing a lapped or centered zipper with the invisible zipper that a pattern calls for, sew this zipper in per the directions below first before doing anything else to the seam. As a final note, this sample was sewn with the wrong side of the fabric on the outside by mistake; adjust accordingly from the pictures you see here.

Step 1: Take a moment to look at your invisible zipper. The part with the teeth is actually folded out over the rest of the zipper (I'm holding it up to reveal the underside of the teeth in this picture). When sewing your invisible zipper to your fabric, you want to sew in this space as close to the teeth as possible so that you actually end up underneath them. An invisible zipper foot can help you do fold the teeth out of the way. Ironding the zipper so that the teeth are unfolded away from the rest of the zipper tape also helps (remember to set the iron on low so that you don't melt the zipper).

Step 2: With the zipper unzipped, pin one side of the zipper to the fabric along the raw edge, right sides together so that the zipper is facing down with its teeth inward, and the right side of the fabric is facing up (this is where I went wrong--the wrong side of my fabric is facing up). Sew from the top downward with your zipper foot as close to the teeth as possible, holding the zipper teeth unfolded by hand if you don't have an invisible zipper foot. Stop about 1" from the bottom of the zipper.

Step 3: Line your fabric up so that the fabric and zipper will be even with the other side. Repeat step 2 with the second side of the zipper.

Step 4: To finish off the rest of the zipper, zip the zipper and, on the wrong side of the fabric, hold the selvadges together so that the zipper will not get caught in the machine. Start your stitching at 1/8" of an inch to the outside of the last stitch. Stitch down for two inches, change to a regular presser foot, and finish the seam. You can secure the ends of the zipper to the selvadge with a couple of stitches to hold it in place.
Check out the tutorial at Burda Style.
Check out the tutorial at Burda Style.


Thanks for this tutorial! :)
ReplyDeleteHere's the post