Showing posts with label garment: special occasions. Show all posts

Fairyland Dress

I love dressing to a theme, and so when our friends invited us (and Beatrix!) to their wedding at Fairyland in our old neighborhood I couldn't resist making an over-the-top dress for the occasion. 


Pattern: Simplicity Misses Cocktail Dresses #4070 bodice with a self-drafted double circle skirt
Fabric: 6 yds each of satin twill and organza
Cost: $75

My dress was inspired by this elaborate creation from Krikor Jabotian's 2016 collection. I love the challenge of trying to recreate a couture piece from an image and spent a lot of time on the research for elaborate pleats like this and this. I eventually decided on a double circle skirt (two circle skirts sewn together) with tapering and pleating on the front half. I can't say exactly how it worked out because I adjusted the pleats right up until I sewed the final skirt onto the bodice (and a few times after) until I got something I liked. I did add one extra piece to the front for... modesty. 
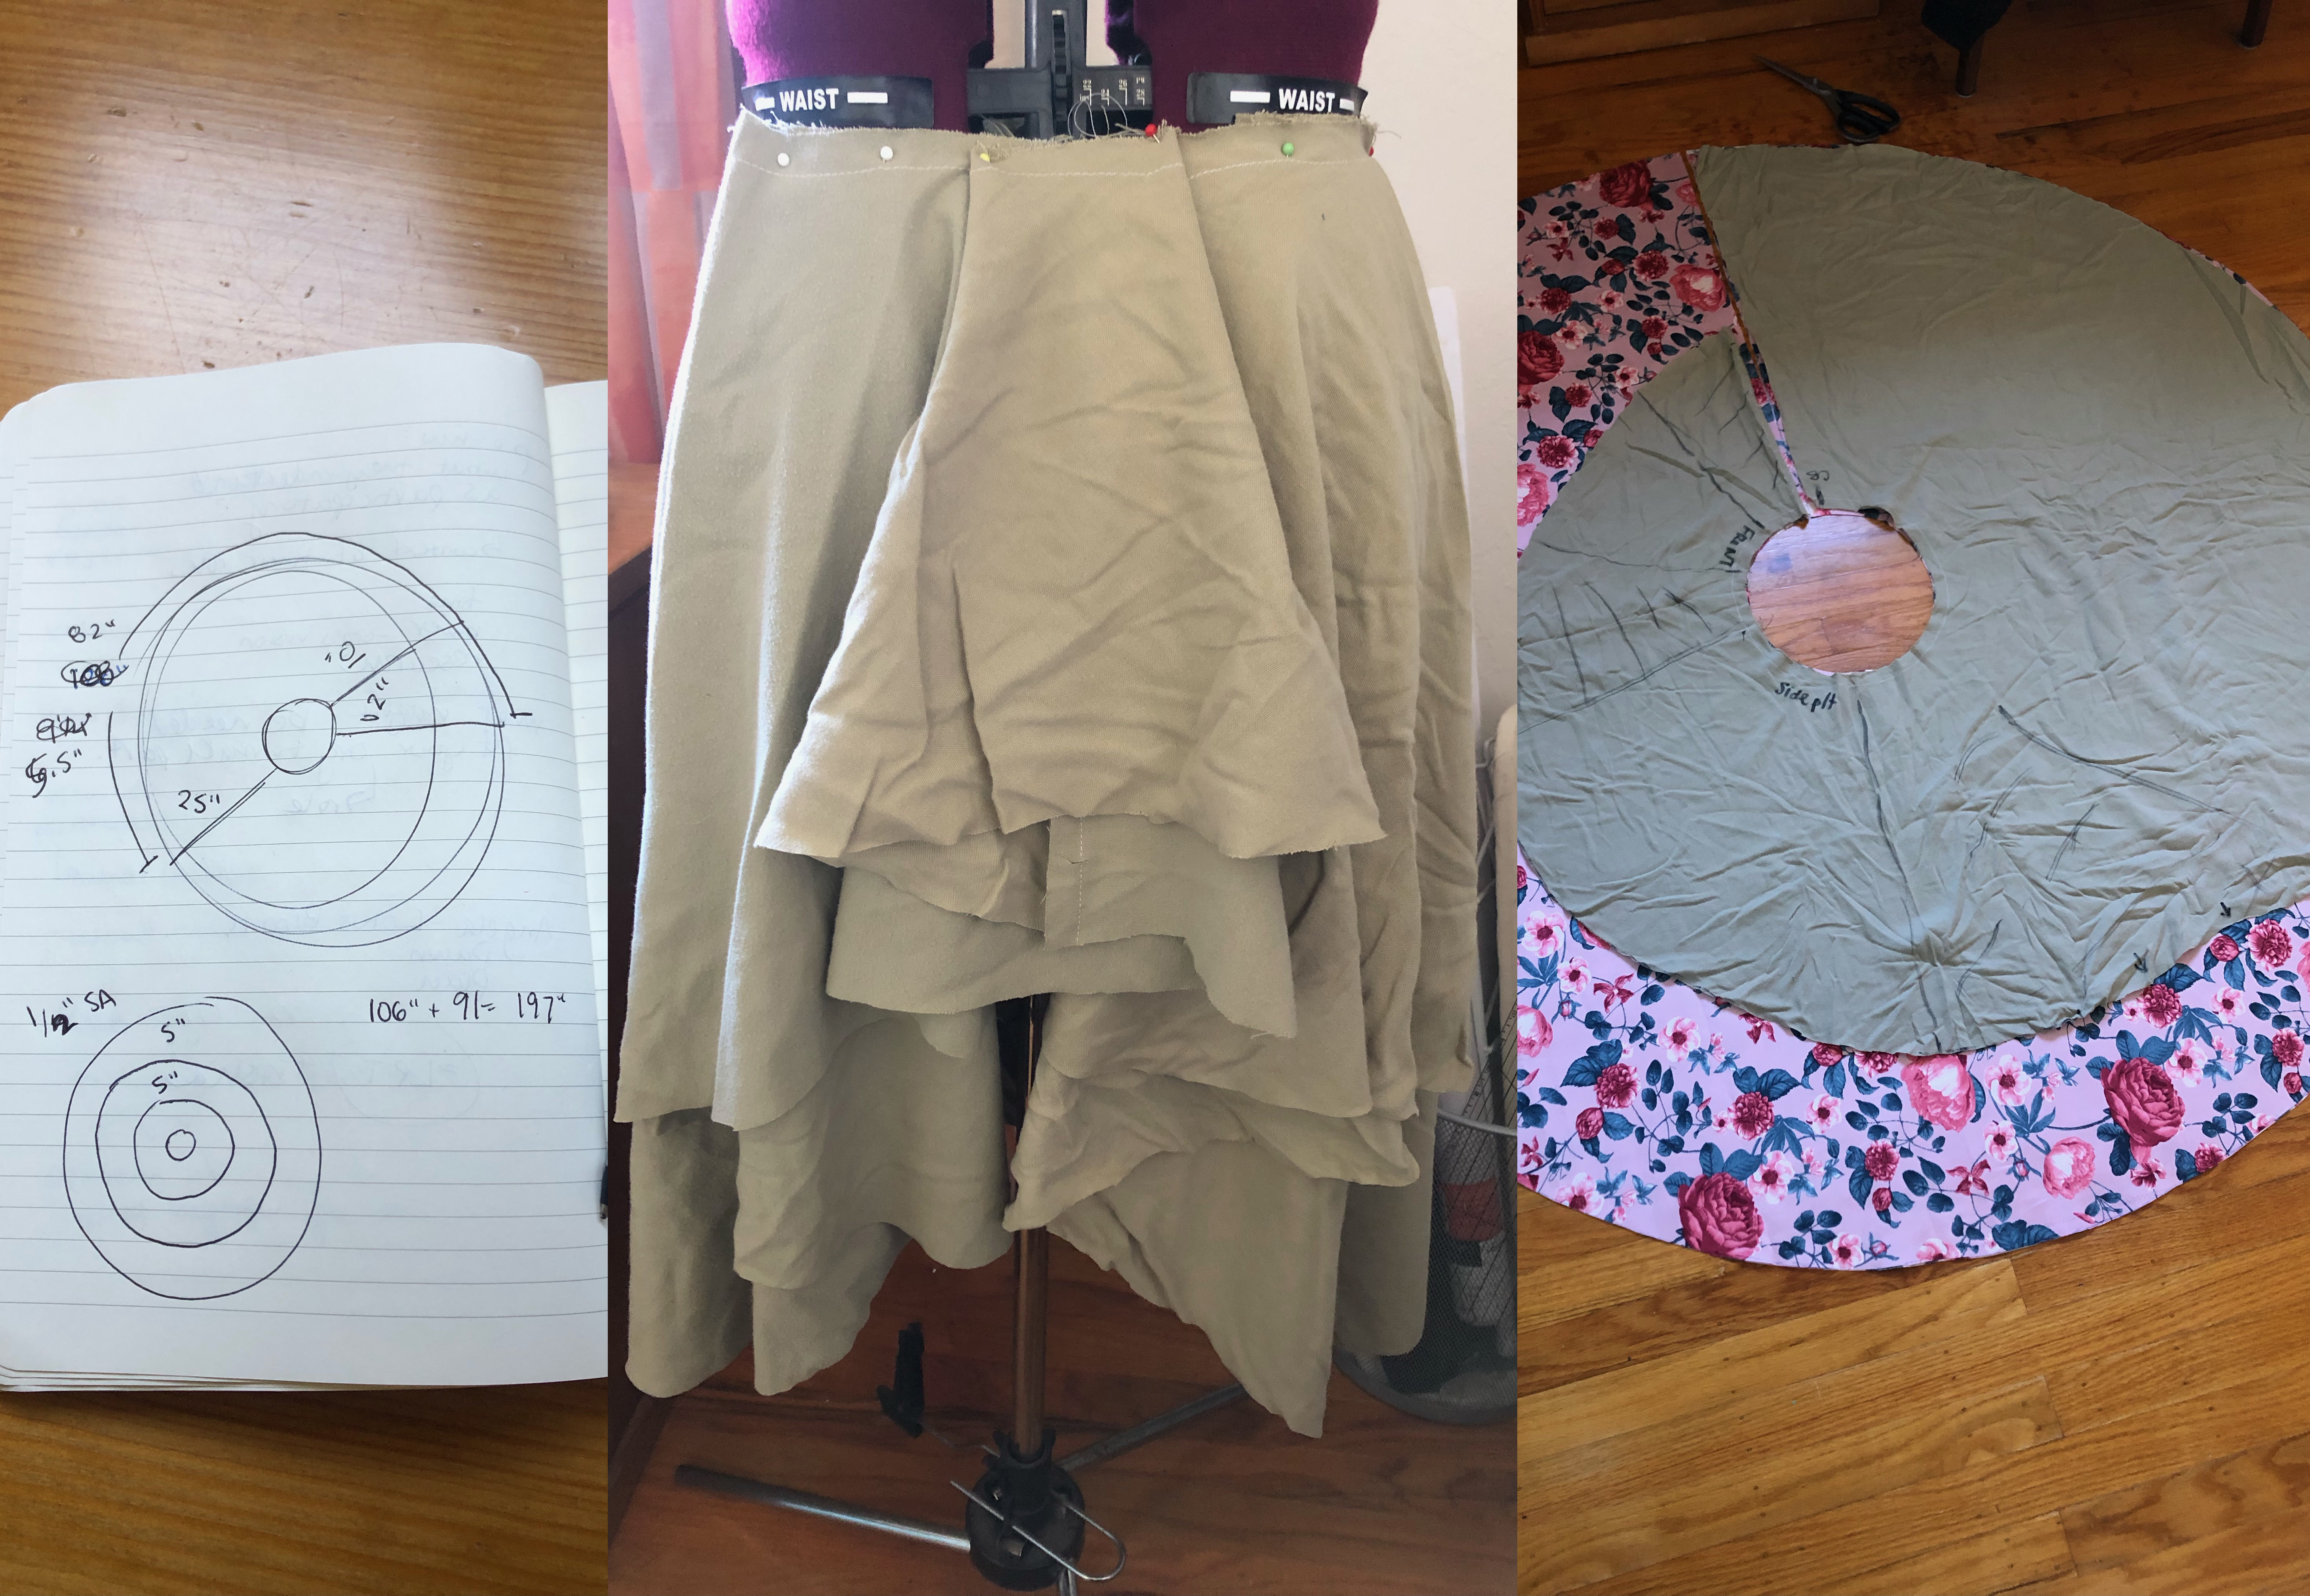

I love how even in the back, without the pleating, the double circle drapes really nicely


To give the skirt added volume, I created a petticoat with two tiers of ruffles out of red organza to line the fabric. I think I cut and sewed nearly 100 feet of ruffles. As if that wasn't enough, it's hemmed with horsehair braid - a cheap one that caused me a bit of grief. After machine-sewing the horsehair to the hem, I turned it under and hand-sewed it for an invisible finish that took me all of one evening. I also hand-tacked the petticoat to the skirt at regular intervals. 


The bodice is my go-to Simplicity #4070 that I've been making dresses with for nearly a decade. I did a heart cut-out for the back which was fun to put together and not all that difficult once you get your head wrapped around it. 


I even sewed a little capelet from Vogue #9315, a top pattern that I thought had good potential to be used as outerwear. The wool and lining were leftover from my husband's coat, and very much needed on any California night. 


My one word of advice is, if you make a fancy new dress, don't let Beatrix in a tux steal the show. And get your man a matching bow tie, of course. 


Spring Dress Mash-Up

After a few years of t-shirts and sweatpants, it felt good to break out the dress patterns again. It took me about a month to sew this one up, and I enjoyed taking my time to make something nice. 


Pattern: McCall's Meadow Dress M8105 with McCall's Dawn Dress M8104 
Fabric: 2+ yds rayon
Cost: free

This dress is a mash-up between M8104 and M8105, mostly because I got the two mixed up in my head and thought it was one pattern. Once I dug them out and realized my mistake, I couldn't help but try making my vision a reality. The dress is mostly M8105 with the cut-on sleeves and sleeve ruffles of M8104. 


McCall's M8105 is actually a pretty clever pattern. The base is a simple strappy dress, but there's a tie overlay that attaches to the neckline and wraps around the body, giving it a faux-wrap style. It makes it very easy to fit but with a sophisticated draped look. 

What was not so easy was adapting it to have cut-on sleeves. That, and making it out of just 2 yards of fabric. I used every scrap of the fabric and puzzled through some fitting issues with the sleeves and the ties. Admittedly, I probably wouldn't recommend this mash-up, as the ties can pull a bit on the sleeves. But it ended up looking pretty good and even gives me enough movement for dancing. 


But I can't quite make up my mind about the sleeves. I love the flounce in theory, but on my body it feels like it overwhelms my frame. For our second wedding this month, I took the sleeve flounce off to try it the other way. What do you think? This is the second time I've sewn a project with the sleeves from this pattern and the second time I've taken them off, so there might be a lesson in there. 


As a bonus, the Mr. got to finally wear this coat I made for him way back when we thought we were going to a wedding in March 2020. 


Lacey Goodness

*Sigh* I don't think I ever get tired of making pretty dresses. We're still averaging about three weddings a year and I treat each as an opportunity to make my next idea. A girl's gotta have some excuse to dress up, right?


Pattern: McCall's Misses Dresses #M7719
Cost: $50
Fabric: embroidered poly netting with rayon/silk blend lining

This time around I tried out the new McCall's 7719, one of this past season's fancy dress patterns. I really wanted to work with some more lace or embroidered tulle (wedding dress making withdrawals?) so I found this beauty on the Joann Fabrics website on sale for just $7 a yard. I had to drive to the next town over to get it, but I scored over three yards for under $30. The Bay Area Sewists kept commenting on how expensive it must have been at our Frocktails so I think I successfully tricked them all. To enhance the lace effect I picked up a rayon/silk blend at a Hart's fabrics sale over the holidays in a tone that matches my skin color. As a lining it feels very soft and truly luxurious.

As with any new pattern, I like to do a bit of research on Pattern Review and Instagram to see how others have made it up and anticipate any issues. There weren't many versions of this view up yet but I did notice that several people had issues with gaping at the side of the bust cup. This meant a muslin was in order (enter amazing cartoon fabric from the stash). I was really glad I put in the extra effort because I had the same issue. I found I could pinch the excess out at the waist seamline (see the cup on the left side of the picture below). But, as you can see, that distorts the shape of the cup. To fix that, after pinching the excess out at the bottom of the cup, I re-centered the top of the cup so it pointed toward the strap as designed. That fix is shown on the dress form on the right and the patter pieces below. Much better!

But you can't leave it there! I pulled a favorite trick from Mrs. Mole of Fit for a Queen and snugged up the sides of the cup. She uses twill tape to gather some of the extra ease; I used elastic and stretched slightly as I sewed. The result is a cup that hugs to your body and stays just where it should. I also added a second piece of lining and tucked a bust cup in there for added shape. This is definitely not a dress you can wear a regular bra with. See how the elastic makes the pieces cup inward even as it lays flat on my table? That's what you want. 

Much better! From there the dress was smooth sailing. I just had to pick my pattern placement carefully and sew it up. As opposed to, say, a Vogue pattern, this dress doesn't have too many pieces and comes together easily once you have the fit of the cups and waist worked out. I didn't add boning but I did innerline the waist pieces with a sturdier canvass for a bit of shaping. 

The outer skirt is just a gathered rectangle of the lace. The lining uses an A-line skirt pattern with no gathers to reduce bulk at the waist. I have also used a circle skirt for this purpose in the past to good results. 


Perfect! Loving it! Just one problem. Is it too slutty for a church wedding? Hmmm....

I had just enough fabric leftover to make a cover up that I could wear to the ceremony. I was able to squeeze this little crop top out of it and I think I might like this look even better! The trick was to cut it short enough to still show off my waist shaping. It feels like a cute little 60s two-piece set!


Isn't the back fun? Here's the scoop: I knew that I wanted to be able to take this on and off myself with little difficulty to transform throughout the night. So I devised a plan where the back of the top crosses over and secures at each shoulder. To make it extra easy, I chose some magnetic snaps so I wouldn't have to fiddle too long with my outfit. Just unsnap each side and you can pull the crop top off with little effort. Here's a little sequence of the transformation. Fun, right?


As I mentioned, I already got to wear this baby to Frocktails and will be dragging it up to Vancouver later this month for the wedding. It was such a fun project all around and I can't wait to wear it dancing (especially since I now know everything will stay in place!). 


Charlie Brown in Drag

My friend recently complimented my dress, saying it reminded her of one she had when she was a teenager. She liked it a lot and wore it to her aunt's wedding. Apparently, however, not everyone was a fan. Later, she learned that the same aunt had commented to another relative that she thought it made my friend look like Charlie Brown in drag. Ha!

Luckily, now our egos don't bruise so easily and we've decided that being Charlie Brown in drag is a wonderful compliment which I will wholeheartedly embrace! So I present to you, my NYE dress of 2020. Oh brother!


Pattern: based on New Look 6460 with sleeves from New Look 6217
Fabric: velvet and sheer chevron stretch fabric lined in jersey
Cost: $30

Now that you can't get that image out of your head, let me tell you a little bit about it. I discovered this fabric at Crossroad Fabrics in my hometown over the holidays. Carla always has something interesting on hand, usually at killer prices. She gave me this amazing 2-yard cut of velvet and sheer chevron fabric for $13! On my way out of town, I picked up the coordinating yellow jersey at a Hart's Fabrics sale to line the dress. 

I knew I wanted to make something for New Year's Eve but was away from my machine. So I spent my nights dreaming up the best way to use this special fabric. I fell in love with this inspiration dress and was left figuring out how best to construct it.  


There are a lot of similar dress patterns on the market, but I wanted to work with the patterns I had on hand. I used New Look 6460 and grafted on the large cut-on sleeves from the jacket in New Look 6217. I cut the front as two pieces, making it easier to do the v-neck and the front slit. It did make for some work matching the front. I used lots of pins and the chevron pattern still isn't quite perfect. 

It also took some thought to figure out how to line it. I ended up doing lots of understitching to keep the lining out of sight, which is a bit tricky in a knit. The neckline also has elastic to prevent it from stretching out. Also, there are boob cups. I put them in pretty much everything now and it really solves the issue of finding the right undergarments. 


I'd only had it finished for about a week and had already managed to wear it twice: once on New Year's Eve and again that weekend to my friend's bachelorette. It's comfortable and special at the same time. And I still have a little bit left, so we'll see what becomes of it. 


The Concept, the Outfit

Inspired by or copying? This is often a hot debate - some say that you should never copy outright. But I say - go for it! How do painters master their art? By copying the greats! How do apprentices hone their craft? By following their masters! You can run into problems when you try to pass off someone else's designs as your own (and it is especially wrong when you are a big corporation ripping off someone less powerful than you), but for home sewers I highly encourage you to try to copy your idols. 

Pattern: final design adapted from Deer and Doe's Sirocco Jumpsuit
Fabric: Robert Kauffman stretch suiting
Cost: $40

That said, if you're like me, you will quickly learn that copying high fashion is HARD. What looks like a few simple ruffles, a twist, a skirt, is actually a carefully crafted masterpiece honed over months and made by hand in a couture studio. And that's what makes copying the masters such an interesting project. You truly appreciate their skill and mastery of the craft. 

By comparison, I quickly realized my shortcomings. Below is the original Johanna Ortiz inspiration that I fawned over for months. I love that it is fancy, but still a pantsuit. The drama of the ruffles, the flare of the skirt - I wanted to copy everything except the bell bottoms.

It took me over a month of making muslins to get something together. There were a lot of changes along the way. I'm not sure I ever quite figured out how they got those ruffles so perfect. And the skirt hung terribly - it had to go. The top is separate from the pants, but I had to add a strip of fabric to make it long enough. What I got is the version you see below. 

Overall, it was fine. But a far cry from the original. As you can see, I got all dressed up and wore it to a wedding. It was fun, but overall the outfit felt just meh. The pants showed a lot of draglines, as did the top under the bust. The zipper rubbed a bit when I wore it. Compared to the beautiful designer look, I had fallen short.

It was back to the drawing board. And this time I decided that maybe I just wasn't up to copying the original. Instead, I decided to go with the "inspired by" route. Based on my first experience, I thought version 2 would be much better as a jumpsuit. I made a few design changes to streamline the look. And, luckily, I had just made my first Sirocco and was feeling inspired to try this again.

This version uses the bodice of my go-to Simplicity #4070 princess-seam bodice with the pants of the Sirocco jumpsuit. I ordered my favorite Robert Kauffman stretch suiting, re-purposed the sleeves, and was on my way. Compared to the first version, I was now using my tried and true patterns, a favorite fabric, and a design I had partially made before. In comparison to the first version, I was cruising.


Much better! It's still no designer outfit, but this version fit better and felt more polished. I added spiral boning to the bodice so that it holds its shape. Thanks to the drafting of the Sirocco pants, there are also now no draglines or crotch wrinkles. And it's so much more comfortable! 

And don't forget those sleeves!

I actually had the whole thing sewn up when I decided it needed a bit more color. I picked apart the pockets (including near the zipper! the horror!) and added the contrast fabric there as well. As you can see from the sleeves, the brocade is a brilliant pink on the underside but a more coordinated black with florals on the outside. It was a lot of fun to play with it for this design. I like how the pockets stand out now a bit against the otherwise black jumpsuit.


This project has definitely given me a big appreciation for designer looks and may give me a bit more pause next time I decide to copy one. But now I have a new outfit for our next wedding, which will be in January - a perfect time for a jumpsuit!

Have you ever successfully copied a designer style? Did it turn out the way you hoped? I admit that it's hard!

THAT Vogue Dress

Remember this pattern? Yes, THAT pattern. The one Lladybird called the "droopy boobs trying to pretend like they don’t know each other" pattern. I have to admit, I kind of liked it. So I made it!

Pattern: Vogue's Nicola Finetti #1587
Fabric: something polyester?
Cost: $20

What inspired me about this dress was the sleeves. I liked the take on the cold shoulder. When I saw the pattern, I imagined them in a semi-sheer fabric. To make it happen, I walked into the fabric store open to whatever colors I could find that came in sheer and opaque. Pink wasn't my first choice, but the color's not bad on me. Plus I found them next to one another in the bargain section, so this dress was cheap! It's hard to photograph, but I like how the lighter sleeves move with the dress while the body is quite stable.


Now, some of the critiques of this pattern were definitely justified and there were a few modifications I wanted to make. First, I raised that neckline. Then, I got rid of the front slit. Really, who could sit down in that?! I seriously laughed out loud just thinking about that. 

I also wish that I had raised the armhole. Every Vogue dress I've made in the past year has had a very low armhole. I made no other changes, though you can see it fits me a bit differently than the model. The dress is fully lined and I added bust cups, my new secret weapon for dresses that aren't bra friendly. 

So far this dress has been really fun. It's made it to two weddings and Vegas. The one drawback is I really can't lift my arms very high, even to drink from a glass. I wouldn't recommend sleeves like this for everyday wear.  ðŸ˜‚

So what do you think, love it or leave it? 

Red Dancing Dress

It's wedding season again and I haven't been short on inspiration. I scooped up Vogue 1545 during the last sale and was excited to have an opportunity to sew it up for my friend's wedding this past weekend.

Fabric: 2.5 yds ponte double knit
Cost: $35

While this pattern is designed for wovens, I thought a scuba knit would give it some nice body. Maybe a print? I excitedly jumped on the internets, thinking up a million ways (ok, five) to dress up this pattern. But wait a minute, you might be saying, this dress isn't made in a scuba knit or a print. What happened? Well, let me just say that the FIRST version was. I ordered this wild floral kaleidoscope print from Mood, spent way more $$ than I should have, and eagerly waited for it to arrive. When it came, boy was it bright! Despite my reservations, I sewed it up anyway. And it was... still too bright. I hated it. I couldn't even bring myself to wear it on our Hawaiian vacation. If anyone wears neons better than I do and has 38" hips and a 32" bust, it's all yours! 

It's been a while since I'd made a disaster as colossal as sewing a garment I could/would never wear. What to do next? I eventually decided I still wanted to make this dress, but a solid might be better. I ordered a beautiful red scuba very cheaply off Amazon. Waited for it to arrive. And, you guessed it - it was VERY bright. It looked like a shade of traffic cone orange. What was with my sudden attraction to neon fabrics on the internet? Do I need to adjust my monitor? I tried to dye it darker to no avail and realized I needed to try a THIRD time for the right fabric. This time, it was straight to my local fabric store for this scarlet ponte double knit. Bingo. 


With the advantage of having already sewn up the dress once, I made a few modifications. I had graded it out from the bust to the hips and needed to take the pattern back in some at the waist. As it was made from a stable knit, I also sized the top down a little, bringing in the darts along the waistline and taking in the sides. In hindsight, it may still be a smidge loose but on a dress like this you don't want it so tight that it pulls open at the front. I also added bust cups to fill in the top a bit more, as on many smaller figures the dress appears a bit... hollow. 

After photographing the dress, I ended up tacking the overlays to the body under the bust to help things lay flat. I remember that I also shortened the overlays by a bit as the tended to gape. Despite the slim model that Vogue uses, I think this dress is cut for figures that are more endowed than myself. 

In addition to those modifications, I also raised the armholes by a good two inches to help hold things in place. This is the second designer Vogue pattern I've made recently that has very low armholes and it makes the whole fit feel off to me. I brought these back up to a comfortable depth for me. I also sewed the front opening shut for several inches to try to hold things in place. I'm glad I did, as it can gape a little with wear as it is. For those considering making this dress, I would recommend stabilizing the front opening to pull things in and make it conform to the body. In the case of this knit dress, clear elastic would work well. 

To help reduce bulk with all these layers, I lined the top of the dress in a matching stretch mesh. Some reviewers of this pattern said they had trouble figuring out the lining instructions, but I just made things up as I went along. The top is fully lined and understitched to hold things in place. I left the overlay unlined to further reduce bulk. The skirt is also unlined and unhemmed. 


After all my fabric woes, I am happy with this dress. I love this color on me and I feel like it is a versatile piece I could wear to a few events. The knit fabric also makes it very comfortable. 

The back is a real stunner with an opening and metal zipper. I closed the skirt in the back with a gold button after forgetting to attach the zipper through the waistband. 


After all my fitting and fabric tribultions, this dress finally ended up working out and makes me feel like the red dancing emoji. And that's how we spent the wedding, dancing the night away in a warm summer vineyard. 


Velvet Holiday Pants

Are you still struggling to get back into gear after an end-of-year break? I am. I've been slooow to get back into my regular routine. I'm still thinking about days of sleeping in, eating Christmas cookies, and seeing friends. And I haven't even shown you my sparkly new New Years pants yet! Well, here they are...


Pattern: self-drafted pleated pants, though you could get a similar look from the True Bias Hudsons
Fabric: 2 yds Haiko crushed velvet in Bordeaux
Cost: $25

There I was hanging out at the end of December with no real plans to make myself anything new for the holidays. Well, I don't know what got into me, but all of a sudden I HAD TO HAVE a pair of velvet pants. They would be perfect, I thought, for our relatively casual plans. Not as fancy as a dress, and with a stretchy waistband for all the Christmas cookies. Yet still with a bit of sparkle to say that I care.

It was a work day, but things were slow. I checked the nearest fabric store on the way home but didn't find what I was after. In fact, the velvet they had there was so wrong that I almost gave up on my idea. But with one more hour to spare, I ended up driving across town to Stonemountain, where I was blessed with a rainbow of stretch velvets. I had my pick and ended up with this beautiful crushed stretch velvet in Bordeaux, the perfect fabric for my pants dreams.


The construction for these pants was easy but a bit experimental. I used the pattern I had created for my little black jumper a few years ago. I have always adored the easy fit of those pants, which is tapered with a nice drape. I ended up scooping out the back crotch curve a bit more and playing with the fullness of the leg until I got something that worked in my fabric.

In addition to pleats, it also has some pretty useless pockets that I like to tuck my hands into. They are sewn with just the pocket bag topstitched to the front of the pant. That was a bit of a puzzle with the pleats, but allowed me to reduce bulk at the waistband. The waistband contains a elastic that 2 inches wide, which I had to topstitch down because it kept twisting inside the facing.

I wore these for both Christmas with my extended family and New Years Eve at my friends' house. Neither was a particularly glamorous affair, but both called for something a little special in our casual world. I felt comfy and warm in my crazy new pants, and maybe even slept in them when I was a little too tired/buzzed to change at the end of the night.

As for their future, I hope I can find a few more events at which to wear these. They also make wonderfully glamourous pajamas so I can see myself wearing them around the house as well (I may have already done this). The Mr, of course, thinks they're ridiculous hammer pants, but I think I like them that way.

Here's to a sparkly new year!

Wedding Dress Sewing: Rehearsal Dinner Dress

While we wait to get some wedding dress photos back from the photographer, I wanted to show you my rehearsal dinner dress, aka the place for all my leftover wedding dress ideas.

In my wedding dress inspiration post, I talked about how I narrowed down a lot of pretty inspiration pictures to get my design. But that didn't mean the ideas stopped coming. Or, more accurately, that every time I logged onto Pinterest I didn't see a ton of more inspiration pics. Since I was wedded (ha!) to my wedding dress design, I decided to incorporate some of the leftover ideas, so to speak, into a dress for my rehearsal dinner. Conveniently, I was also able to use my leftover wedding dress fabric for the under dress. 

Pattern: Lining pattern of Simplicity Cynthia Rowley #1104 for bodice with an A-line skirt
Fabric: 3 yds ivory beaded 3D lace and wedding dress silk viscose remnants
Cost: $95

The main inspiration for this dress was the amazing lace. For some reason, I got it in my head that I wanted to pick some of the most over-the-top, wild white lace for a dress. I browsed for a few months and finally decided on this one. It has beautiful 3D flowers over some of the embroidery, as well as beading at the center of each flower. The gaps between the rows of flowers left a lot of room to add things like darts and shaping, while the scalloped edges at both the bottom and the top were perfect for the hem and sleeves. 

Unfortunately, the seller messaged me and asked if they could send the fabric in two pieces and, stupidly, I said yes. When I got the fabric I realized that I wanted the full three yards for the skirt. Oops. I then had to piece it back together. This turned out well, however, because I got to practice my lace piecing technique and it was actually really fun. The result is pretty flawless and the seam was hard to find even when I was looking for it. The piecing is shown in the photo on the left, straight down the middle of the picture, and it is nearly impossible to tell if you're not examining it up close. It worked out so well, in fact, that I pieced the center back seam of the dress up to the zipper and had a beautiful skirt all the way around. 

As I mentioned above, the underdress is made from the remnants of my wedding dress fabric. I had saved just barely enough to eke out the skirt and bodice, even piecing the front bodice down the center front. And because of the demure length of the lace overskirt, I was able to cut the underskirt at a very short and flirty length. It felt daring and fun but with the added coverage of a bit of a lace. 

The pattern is my tried and true Cynthia Rowley #1104 dress, although this time I used the lining pieces instead of the main pieces as my pattern. While the original dress has great tucks and princess-seamed shaping, for this dress I needed simpler shaping to not interfere with the lace detail. The lining pieces, while preserving the same neckline and look of the dress, provided the perfect solution in a pattern I knew would fit. I then added an A-line skirt for the under-dress and a pleated skirt for the lace dress. The lace dress also has some pretty flutter sleeves, which I stole from another pattern in my stash. 

Originally I had thought about making these as two separate dresses, which would have allowed me to wear the lace dress over a different colored dress in the future. However, the lace fabric, with all its 3D flowers and beading, was actually very heavy and I knew it would be too heavy for the mesh bodice on its own. For this reason, I sewed the lace bodice to the silk bodice at the waist seam, and then attached the two skirts as one dress. 

The rest of the construction was fairly straightforward, and I was able to borrow some of the techniques I'd used on my actual wedding dress. The organza of the lace is bound in bias binding on the bodice, and the bodice is sewn together with small french seams to enclose the raw edges. The underskirt is trimmed with horsehair braid for added fullness. 

I also underlined the silk bodice pieces with some scrap white cotton to give them a bit more body, serging them together at the ends to prevent unraveling. I used a not-so invisible zipper at the back - the fabric was too bulky for some other zipper treatments, and I was afraid to sew too close to the zipper coils because I knew the thick waist seam might not zip if I did. 

It was a bit of a squeeze to get this dress done in the two weeks before the wedding, but I finished it on a Sunday, four days before we left for the wedding. And I never mind the excuse to hole up in my sewing room for a bit!

I was glad I did because the dress really did make me feel special. It was also a fun little sneak preview of some of my ideas for the real thing. All that was left to do was take pictures in the beautiful garden at the restaurant and drink (white) wine with our guests!

My mother-in-law did a truly beautiful job throwing us a rehearsal dinner. Some photos from the event:


I suspect it may be a little while longer before I have some proper wedding photos to show you of the final wedding dress and bridesmaids dresses, but I'll be back next week with some other wedding sewing I had up my (lace) sleeve. I just couldn't help it!

[Find the full list of wedding dress posts here.]
Related Posts Plugin for WordPress, Blogger...