


Pattern: Kwik Sew's Bra #3300
Fabric: interlock knit
Cost: a few dollars each

I tried to like KwikSew 3300. Five times over, in fact. Yes, I have made at least five versions of this bra (more if you count the re-makes and tweaks). I wish I could say I'm completely happy with the results of at least one of those bras, but at this point it seems to have turned into an unhealthy obsession.
Now, before you point out all the bra-fitting resources on the internet to me (including the ones I've already saved to my pinboard), I am a learn-by-doing sort of gal, meaning I'm not likely to seek help until I've worked through something in my own little way first. I find that in this process I actually learn more about the construction in general, and also truly understand what I need to learn when I do seek help. So, below are some utterly wrong and some not-so-wrong fitting techniques that I tried:
When I first tried the bra on the cups were much too big. I thought if I took out the curve from the bottom this would give me some lift and take out the volume. WRONG. This just meant the bottom of the bra didn't conform to the curvature of my breasts, and instead sat on my breast tissue. Not comfortable!

Next up I tried to make the cups smaller by taking off some volume from the top. I also took the sides in under the armpit because those pressed too far into my underarm for comfort. This did give me a smaller cup but I still didn't fill it out, and now I just kind of spilled over the top.

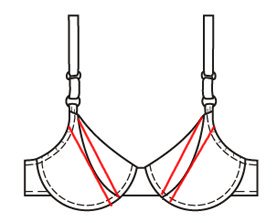
Next I actually looked up some bra-fitting techniques, and decided to play with the cup seam. I removed volume by pinching out a dart-shaped chunk of fabric from the upper and lower cups.

Finally, I also tried to reduce volume by straightening the curve of the cup seam.
I think the stitching and look of the bras turned out great (see below), but at this point, every subsequent bra I made seemed to still need some additional changes. I could continue making these indefinitely, but at some point I just had to call it quits and decide that this pattern just did not work for me.


I ended up not using underwires for this project because my A-cup sized ones are just too narrow for what works on me (even though I don't have much volume, curve-wise I think I need something more like a C). And second, I didn't really notice any difference in lift when I slipped the underwires that I did have into the casings. I will continue to experiment with my next bra pattern.
The main thing I learned in the process is that a big part of what makes a bra uncomfortable is when any part of the band/cup seam sits on your breast tissue - even in a bra without underwires or foam cups, it was still very uncomfortable for me. As you can tell, I am also learning a lot about my breast shape (I'll spare you the details!).
Onward and upward!

Fabric: interlock knit
Cost: a few dollars each
I tried to like KwikSew 3300. Five times over, in fact. Yes, I have made at least five versions of this bra (more if you count the re-makes and tweaks). I wish I could say I'm completely happy with the results of at least one of those bras, but at this point it seems to have turned into an unhealthy obsession.
Now, before you point out all the bra-fitting resources on the internet to me (including the ones I've already saved to my pinboard), I am a learn-by-doing sort of gal, meaning I'm not likely to seek help until I've worked through something in my own little way first. I find that in this process I actually learn more about the construction in general, and also truly understand what I need to learn when I do seek help. So, below are some utterly wrong and some not-so-wrong fitting techniques that I tried:
When I first tried the bra on the cups were much too big. I thought if I took out the curve from the bottom this would give me some lift and take out the volume. WRONG. This just meant the bottom of the bra didn't conform to the curvature of my breasts, and instead sat on my breast tissue. Not comfortable!

Next up I tried to make the cups smaller by taking off some volume from the top. I also took the sides in under the armpit because those pressed too far into my underarm for comfort. This did give me a smaller cup but I still didn't fill it out, and now I just kind of spilled over the top.

Next I actually looked up some bra-fitting techniques, and decided to play with the cup seam. I removed volume by pinching out a dart-shaped chunk of fabric from the upper and lower cups.

Finally, I also tried to reduce volume by straightening the curve of the cup seam.

I think the stitching and look of the bras turned out great (see below), but at this point, every subsequent bra I made seemed to still need some additional changes. I could continue making these indefinitely, but at some point I just had to call it quits and decide that this pattern just did not work for me.
I ended up not using underwires for this project because my A-cup sized ones are just too narrow for what works on me (even though I don't have much volume, curve-wise I think I need something more like a C). And second, I didn't really notice any difference in lift when I slipped the underwires that I did have into the casings. I will continue to experiment with my next bra pattern.
The main thing I learned in the process is that a big part of what makes a bra uncomfortable is when any part of the band/cup seam sits on your breast tissue - even in a bra without underwires or foam cups, it was still very uncomfortable for me. As you can tell, I am also learning a lot about my breast shape (I'll spare you the details!).
Onward and upward!


You're on the right track! I don't agree with your first two pattern alterations but your second and third are on point! By straightening the curve of the cups, you are reducing the length of the line, which will reduce the volume.
ReplyDeleteGood for you for just experimenting! Even though your alterations didn't quite work I'm sure you've learned a lot about bra construction through trial and error.
ReplyDeleteI'm impressed with your dedication! I'm sure you're get there and once you have a good fit you can make some lovely lingerie :)
ReplyDeleteP.S. I haven't forgotten that I have to do the Liebster award post! I hope to get to it soon
I know you like to work through the process on your own but if you want some help, I just released my book Demystifying Bra Fitting and Construction!
ReplyDeleteThank you Norma - I have seen that and am considering it as a next purchase!
ReplyDelete