


I am slowly teaching myself how to use GIMP, the free Photoshop alternative. I've really been wanting to learn how to use it to enhance pattern line drawings with my own fabric and alterations. In this tutorial, I use GIMP to convert McCall's #M6319 to preview a polka dot shirt design. I am constantly altering patterns to suit my ideas, so this will help me visualize and share what I do. The whole process should take about 10 minutes.

à Open background/fabric image
à Small tile using filters to desired scale
à Open line drawing image as a layer and edit to desired modifications
à Select by color, with threshold around 40
à Add alpha channel
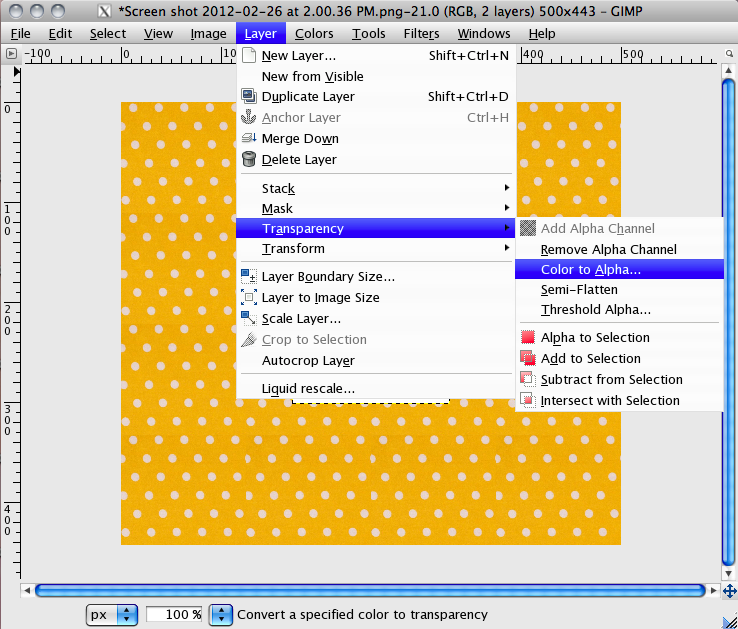
à Color to alpha
à Fill in surroundings with white and crop
Full instructions:
When you open GIMP, you will find a blank window. Select: File à Open.
à Color to alpha
à Fill in surroundings with white and crop
Full instructions:
When you open GIMP, you will find a blank window. Select: File à Open.

In the pop-up window, navigate to the image of your fabric. I find it is easiest to find an image of my fabric online (try fabric.com), and then save it to my desktop. Select your image and click: Open.

The image of your fabric will open in the main window. To get the fabric the right scale, you will want to tile it. Select: Filters à Map à Small Tiles.

You can scale your fabric to different sizes by adjusting the number of segments. I set mine at 4. Click: OK.

Now you will open your pattern image. I save the line drawings from the pattern to my desktop, gotten off the pattern website. To open the line drawing in GIMP, select: File à Open as Layers.

In the pop-up window, navigate to the image of your line drawing. Mine has already been cropped to remove other views and the bottom of the skirt, which I'm not going to use in my garment. Select your image and click: Open.

Use the eraser to edit out any lines or other parts of the image you will not be including in your garment. Use the pencil or other drawing tools to add in elements. To use any of these tools, click on the element in the Toolbox on the left.

I erased the lines of the skirt, as I will be converting this dress pattern to a top.

Next, click: Select By Color Tool from the lefthand Toolbox. This will highlight the lines on your line drawing. You can fine-tune this by adjusting the Threshold slider at the bottom of the lefthand Toolbox. Mine is set to around 40.

Then, select: Layer à Transparency à Add Alpha Channel.

To get rid of the white background, select: Layer à Transparency à Color to Alpha. In the pop-up window, click: OK.
You will now have a line drawing over your fabric pattern.

To fill back in the white surrounding the line drawing, select: Bucket Fill Tool from the lefthand Toolbox. Select the color white. Then: click the cursor in the area that surround the line drawing.

To crop the image down to size, select: Rectangle Select Tool from the lefthand Toolbox. Use it to select the white rectangular region around the white edges of your line drawing.

To crop, select: Image à Crop to Selection.

Finally, to export and save your image, select: File à Save As.

Here is the final product. Not bad, eh?
Other bloggers are using GIMP, too! I plan to check out Leah's GIMP tutorial when I get the chance. And Leah offers an alternative technique.


Meg, I love this! Just last week I was trying to Google how to do this very thing on Gimp, but I couldn't figure out how to say it in search terms. I just tried your tutorial and it's pretty great. I need to get better at taking photos of my store-bought fabric so that when it's scaled down to small tiles it doesn't look so... tiled. Thanks for this; it will be so useful!!
ReplyDeleteAndrea~ I'm so glad it worked for you! Having never used Photoshop before, I was baffled about how to get started with GIMP. After more hours than I care to admit, I made this tutorial so that I could remember all the steps. Now I'm obsessed!
ReplyDeleteI also had a similar problem with my image tiles when I used something other than polka dot. Ideally you'll want to capture/crop a tile-able section of your fabric, but I'm thinking of playing around with the proportions of my pictures so they don't need to be tiled. If you have a big enough picture of your fabric, you can try this instead: Layer -> Scale Layer.
Thank you so much for this tutorial. I've been looking for instructions on how to do this for a while and had come up empty so far. I'm a huge gimp fan too, so you think I'd have figured it out myself at some point, but alas. Thanks!!
ReplyDelete