Showing posts with label pattern: Kwik Sew. Show all posts

Color-Blocked Motorcycle Jacket

Hello hello! I'm rounding out the year with a bright new cozy jacket! This one has been on my inspiration board for quite some time, and it wasn't until all the fabrics came together that I finally got the chance to make it.


Pattern: Kwik Sew #3764
Fabric: 1 yd Italian Black Wool Stretch Twill and 1 yd wool ponte remnant

The red fabric is a beautiful thick wool ponte that Crossroads Fabrics had inherited from an estate sale. I think it's vintage. The amount used here is the remnants from one of my favorite sweaters that I made up a few years ago. The black wool is a luscious Italian stretch twill that I got in collaboration with Britex. The two fabrics were meant to be together and fulfilled my long-held fantasy of making something similar to this fun jacket.


For the pattern, I used Kwik Sew #3764, which was a real pleasure to sew with. While the jacket looks complicated with its collar, zippered pockets, and topstitched seams, it really came together quite easily. I read so many blog posts about how people "are scared to sew with Big 4 patterns," but I think they provide really great instructions with pattern pieces that fit nicely together. Especially when you're working with a Kwik Sew or Simplicity beginner pattern, they really are designed to be easy to sew with!


This pattern is for an unlined jacket, so I surged and topstitched all interior seams. For the center back stitch, I applied a Hong Kong seam binding in a matching red bias tape. It's a fun detail and gives it a really professional look. I have always liked unlined patterns because I thought they were quicker to sew up, but now I'm reminded of how much work it takes to make a jacket look neat and finished on the inside. It is probably much quicker to just throw a lining in and not worry about how messy your unfinished seams look!


The only change I made to the pattern was to take it in at the side seams and sleeves. Just before hemming the jacket I popped it on and decided that it was a bit too boxy. Both my fabrics had a bit of stretch in them and were much better suited for a more fitted motorcycle jacket look. So I pinned out a curve at the waist and took in about 2 inches from the sleeves to make the jacket more fitted. It was a pain to undo the serged and topstitched seams, but well worth it in the end. I also shaved 3/4" of an inch off the shoulder, and probably could have done a bit more as it still has a bit of an unintentional dropped shoulder look. A shoulder pad or sleeve head may look nice, too, if I ever sew this one up again.

The jacket is definitely a bold choice, but I really love it. It is comfy thanks to the stretch and quite warm thanks to the wool fabrics. And it's nice to have something bright to pull on this time of year. To end, here's a pic of me with Beatrix in her Christmas sweater.

Hope everyone is staying warm and cozy this season!

A post shared by Meg (@madebymegblog) on

Bra Quest 2013: All My Kwik Sew Bras!

Pattern: Kwik Sew's Bra #3300
Fabric: interlock knit
Cost: a few dollars each


I tried to like KwikSew 3300. Five times over, in fact. Yes, I have made at least five versions of this bra (more if you count the re-makes and tweaks). I wish I could say I'm completely happy with the results of at least one of those bras, but at this point it seems to have turned into an unhealthy obsession.

Now, before you point out all the bra-fitting resources on the internet to me (including the ones I've already saved to my pinboard), I am a learn-by-doing sort of gal, meaning I'm not likely to seek help until I've worked through something in my own little way first. I find that in this process I actually learn more about the construction in general, and also truly understand what I need to learn when I do seek help. So, below are some utterly wrong and some not-so-wrong fitting techniques that I tried:

When I first tried the bra on the cups were much too big. I thought if I took out the curve from the bottom this would give me some lift and take out the volume. WRONG. This just meant the bottom of the bra didn't conform to the curvature of my breasts, and instead sat on my breast tissue. Not comfortable!


Next up I tried to make the cups smaller by taking off some volume from the top. I also took the sides in under the armpit because those pressed too far into my underarm for comfort. This did give me a smaller cup but I still didn't fill it out, and now I just kind of spilled over the top.


Next I actually looked up some bra-fitting techniques, and decided to play with the cup seam. I removed volume by pinching out a dart-shaped chunk of fabric from the upper and lower cups.


Finally, I also tried to reduce volume by straightening the curve of the cup seam.


I think the stitching and look of the bras turned out great (see below), but at this point, every subsequent bra I made seemed to still need some additional changes. I could continue making these indefinitely, but at some point I just had to call it quits and decide that this pattern just did not work for me.


I ended up not using underwires for this project because my A-cup sized ones are just too narrow for what works on me (even though I don't have much volume, curve-wise I think I need something more like a C). And second, I didn't really notice any difference in lift when I slipped the underwires that I did have into the casings. I will continue to experiment with my next bra pattern.

The main thing I learned in the process is that a big part of what makes a bra uncomfortable is when any part of the band/cup seam sits on your breast tissue - even in a bra without underwires or foam cups, it was still very uncomfortable for me. As you can tell, I am also learning a lot about my breast shape (I'll spare you the details!).

Onward and upward!

Summer Bustier

Pattern: self-drafted
Fabric: vintage cotton
Price: $12


Ah the search for the perfect bustier.

Looking through my pattern stash, I have been pursuing the holy grail of bustiers for some time now. I completed this one just in time for Coachella and the summer festival season. But it has not been an easy road...

Vogue #V1174
My first attempt at a bustier was with Vogue #V1174 in 2010, with its bust seams and piping. I have seen many sewists make this up since, but personally I think it flattens out the bust of a small girl like me. It became a monster dress instead.

Vogue #V1227
Next I bought Vogue #V1227. This one had a vertical bust seam that I think is much more flattering than a horizontal one, which tends to compress the boob. And look how well it hugs the model! Alas, I'm a 32" chest size not a 34", and this pattern required major alterations. It became a bathing suit instead.

Unrelenting in my quest, I recently bought Kwik Sew #3166. After all, this is made to be a well-fitting bustier, and what could be easier than Kwik Sew? This pattern became the base of my top, but had to be altered considerably. I used a woven fabric (this is a stretch pattern), but only had to make it slightly larger. The cups, as usual, were the main problem. I completely discarded the Kwik Sew horizontal seamed cups in favor of the vertical Vogue ones, and then the real alterations began. Even after making up my muslin and cutting pattern pieces, I still had to make a great deal of changes on the final cups. In addition to shortening the overall garment to that of a bustier top, I also made the back taller to better support the bra cups.

The other trick I found is actually in sewing on the bra cups. Because there is such a curve to my pattern, it doesn't work to sew right sides together. Instead, I found it is better to fold under the raw edge of the garment and sew it on top of the bra cups.


The final version is made in a vintage cotton print from the Alameda Antique Faire, and lined in the same fabric. I also inserted underwire, though it is a little too short for this design. The straps are made out of bias tape because I was too tired and had too little fabric. The back has a four button closure, which took a lot of experimentation to figure out. For my next version, I plan to give myself a little more breathing room (perhaps with a stretch section), but other than that it fits pretty much perfectly!


You can ready my review of this pattern at PatternReview.com.

Lace in Bloom

Pattern: Burda Young's Fashion Jacket #8042 + McCall's Misses' Tops #M6164 + KwikSew's Misses' Dress #3778
Fabric: cotton knit lace, underlined with a cotton knit
Cost: $22


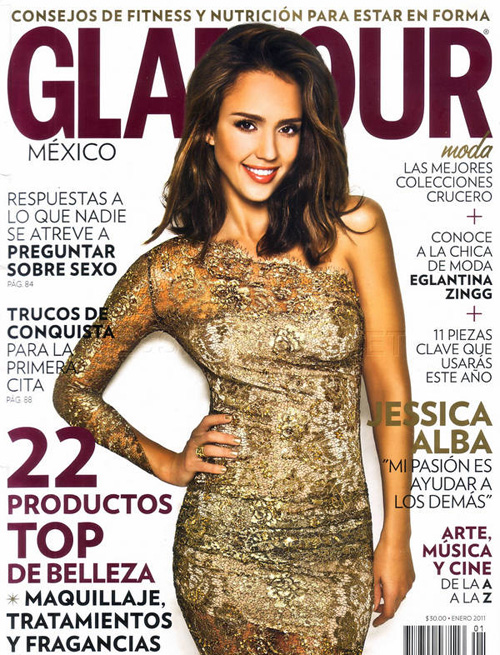
I've been really enamored with sheer lace dresses lately. In my bathroom is Jessica Alba's January cover for Glamour Mexico, and I love that dress! But even after a trip to the lace and bridal supply store, I couldn't find anything that would work for me. While my regular haunt doesn't usually carry lace, this time I found a magnificent and thick cotton one--on sale at that! I don't usually wear pink, but in this case it was just too good to pass up. I bought a blush/tan colored cotton knit--also on sale!--that I used to underline the lace.

The pattern was another Frankenstein of Burda, KwikSew and McCall's. I cut a three-quarter length sleeve and arm hole from the Burda jacket pattern, but ended up never using it because it just seemed like too much fabric. I know a jacket pattern is also probably an odd choice for a fitted dress, but it's one of the only sleeve patterns I've got. The McCall's pattern I used as usual because it fits my hips and I added in the Kwik Sew skirt because last time I made a non-stretch dress out of McCall's knit pattern I had to add extra fabric. I cut extra allowance for a back zipper, but because the cotton lace was actually a knit, it was stretchy enough to pull over my head (this left the hassle of running a large dart down the back to replace the zipper).


Here's my dress from the side with the back-dart and my big booty (ok, I ended up having to take the booty in a little bit):

While tight stretch dresses should be second nature to me now, the more I do them the more I realize that I know very little about how to adjust for fit. I am mostly self-taught so I have my ways, but I'm beginning to think there are better techniques out there. I just discovered the blog Pattern ~ Scissors ~ Cloth, which is an excellent read for all things pattern-making.

My other miscalculation was that I decided to do French seams with all four layers of the fabric. In order to reduce bulk, I ran a zig-zag stitch down each seam allowance and tacked it to the lining. This seemed to help.

I used the selvage of the lace as my dress hem, as this gave it a nice, bulk-free finish that I didn't have to worry about sewing. The lining I left unhemmed because it is a knit, so it won't ravel and usually looks better unhemmed anyway.

I finished the armholes and neck opening by zig-zagging the lace and lining together and folding it under once. 


For a quick weekend dress, I'm quite happy with the results! (And ready for spring.)


Check it out at BurdaStyle and PatternReviews.com.

Cutout Dress

Pattern: Kwik Sew's Misses' Dresses #3778
Fabric: Lycra
Cost: $15


I made this dress for the holidays based on something I saw on Facebook (thanks Sara!). It turned out to be a fun and flattering project! The bodice is fully lined to make finishing the raw edges easier (and there are a lot of raw edges). The bottom is basically a skirt (with the shaping traced from my McCall's pattern) that attaches to the bodice at the center front. This was also the first time I'd used the v-neck version of my Kwik-sew pattern, and I thought the fit and shape were great.


Check it out at PatternReviews.com and BurdaStyle!

Fall Wedding Dress

PatternKwik Sew's Misses' Dresses 3778 (for one shoulder) + McCall's Misses' Tops M6164 (for fit) + Vogue's Misses' Dress V1162 (for ruched detail)
Fabric: patterned mesh (shell), rayon/lyca blend (lining)
Cost: $6 (mess for $2.50/yd + rayon/lycra for $3/yd)


My cousin's getting married at the beginning of October and I needed something to wear. Like my trip out in SF, my sewing lately has been marked by my lack of wardrobe options for special events. And so, I busted out the same one-shoulder dress pattern and some fabric that had been collecting dust on the shelf and got to work, this time with some modifications.

On the first dress, the sizing was waaay too big for me, and I had to take it in a ton. For this dress, I substituted in the shaping of my McCall's top, which fits nicely over my waist and hips. I still ended up having to take it in at the bust a bit, but hey, no pattern really seems to account for my small bust size. Finally, I removed all the flare from the bottom of the dress so that it fits nice and snug at the legs. The beautiful stretch of the fabrics makes it soft and supple, and so that it doesn't feel too tight.

Because the shell fabric for the dress is so nice and drapey, I wanted to really work with that aspect. I used the ruching pattern of my Vogue dress pattern to give the dress some nice detail. I also made the strap of the shell fabric wider than that of the lining to give it a bit of drape there, but this had a less dramatic effect. The outer fabric was then sewn to the lining, which fits tight without any draping.

For the hem, I wanted the bottom of the dress to drape nicely. So before I even sewed the shell fabric to the lining, a hemmed it, sewing both layers of fabric under and attaching them only to the lining. The result is that on the inside you see the single line of stitches across, but on the outside you don't see any stitches at all. I then sewed the shell fabric to the lining before sewing it together at the side seams.


The look of the two fabrics together was so nice that I wanted to make sure to finish the side seams in a nice way as well. On the inside of the dress, I did two self-bound seams. This was possible because there were four layers of fabric, so I could use the shell fabric to bind the lining. It was a little sloppy at times, but after ironing it out it was ok.

Overall, the dress came out great. It is soft and comfy with just the right amount of detail, and in great fall colors that would go with a lot of shoes sweaters. And the best part? It cost less than $6!

You can read my review of this pattern at PatternReviews.com.

Check it out at BurdaStyle!

Banded Dress

Pattern: Kwik Sew's Misses' Dresses 3778
Material: Cotton knit
Cost: $2 (seriously)


What's a girl to do when she gets invited to a party and has nothing to wear? Make a dress, of course! I had been wanting to make a bandage dress for a while (here's my inspiration), and a night out at Asia SF--where "world famous transgender stars perform hourly atop the red runway bar"--seemed like the perfect occasion. Yet after months of sitting around unemployed in my underwear sewing new clothes, I had just started a new job and had not made my dress yet! So a stole a few hours away Wednesday and Thursday night and, using some old scrap fabric, whipped up my own little banded/bandage dress. Perfect for a night out! Here's the story.

Way back when, I had made some cushion covers for a couch and had accidentally bought 12 yards instead of 12 feet of fabric--it was only $2 a yard and so cheap that I didn't notice the difference! (Also, I can't do math.) The fabric was a cotton knit and perfect for stretching over cushions. The other night I whipped out the extra yardage and cut myself some one shouldered pattern pieces. After making my usual adjustments, I took it in in in. While I pre-washed the fabric, the material was cheap (hence the $2/yd price tag) and I think it just kept stretching. There was also the flared skirt that needed to be taken out. And it's possible that my boobs have shrunk, again.

The hard part about fitting a bandage dress is that you have to account for 1/4" pin tucks that will be made every inch or so going down the dress. A patient person would have traced the Kwik Sew pattern out on the fabric, leaving gaps for the pin tucks as they went along. But in all honesty, I just took the dress in as much as I needed to and left some extra, unhemmed length at the bottom to account for the pin tucks. It worked out fine.

To make the banded look, I had planned on using my new pin tucking foot to make little pin tucks horizontally around the dress. But my machine just wasn't having any of that, and no matter how tight I pulled the tension I just got two little parallel lines. I then resorted to the good old low-tech way of making pin tucks: fold the fabric and sew close to the fold. Burda Style has a good tutorial. In terms of spacing, I made smaller pin tucks around the bust, with some curved ones by the shoulder, and spaced the tucks farther (about 1" apart) as I went down. I stopped just below my waist. Of course, not being one to very accurately measure, and this technique being much harder than the machine pin tuck, my lines came out a little squiggly and a little crooked. Luckily it is too dark and people are too drunk in a club to notice my small pin tucking faux pas. 

By the time I got down to the waist, it was 1am on a Thursday night, heading into Friday morning. Having sewed up to the last minute for an event (and consequently arriving late), I imposed upon myself a strict time limit and went to bed, with my banded dress only halfway banded. This was probably a good call as well because the hem was getting just about high enough. While I had originally thought about going back and sewing in more pin tucks later, I don't think I'll put the effort into this garment. Plus, I kinda like the half-banded look--a little different than what's out there right now (and I would know, Countess LuAnn from the Real Housewives of New York was at the restaurant, too, and had on her version of a banded dress). On my next try I would pin tuck all the way down and then sew the pin tucks down to the dress. The pin tucks definitely need to be flattened out, and the one I did sew down along the top looked good. Otherwise I spent a good little chunk of time ironing down the pin tucks down to the dress before heading out on Friday night.

The Kwik Sew pattern itself is actually pretty cool in that you cut out an entire pattern piece to make the asymmetrical look or use only half of it placed on the fold to make a two-strapped dress. To check out my review of the pattern, go to PatternReview.com.

Sherry and me with the beautiful Ciara.

Check it out at BurdaStyle!

His and Hers Bathrobes

Pattern: Kwik Sew Unisex Bathrobe #3177
Fabric: Rayon/Lycra blend
Cost: $7.50 for hers, $9 for his


This was a great little pattern because it can be made in a range of sizes, from men's all the way down to x-small for older children. I made mine from an extra soft Rayon/Lycra blend, mostly because I don't like to put something fuzzy on right after getting out of the shower and because I like the softness and drape of this fabric. I also got it for $3 a yard at Fabric R Us. Don't need more of a reason than that.

His robe is made up just like the pattern, which made a nice, simple men's robe. To make sure I got the fitting right, I used some of his shirts to find the right sizing. He's tall though, so I could have made it a little longer...

Mine got the treatment of some feminine details, based off of a robe I saw at Anthropologie. The belt is sewn on at the side seam with some small pleat details, and the back has a little bit of shirring in the middle. The fit is actually pretty nice, although the fabric is a little bit clingy so it shows all of your, um, details.

These are the pics from Anthropologie:


And this is how it turned out on my robe:


You can also check out my review of this pattern at PatternReview.com.

Related Posts Plugin for WordPress, Blogger...