Showing posts with label skill level: intermediate. Show all posts

Best of Handmade Swimsuits

Bathing suits are one of the few items of handmade clothing that I find are actually cheaper than most store-bought versions. However, despite being two small pieces of cloth, they are trickier to get right than I thought. For the first several years I made suits, most of them were duds. Some didn't feel substantial enough, some too tight, some too loose. But after more than a decade, a have not only improved my technique but also found a few favorite patterns. As the originals had worn out, I thought it was time to reprise my favorites for our recent trip to Hawaii. 

Fabric: swimwear fabrics from Blue Moon Fabrics 
Cost: $75 for all three suits


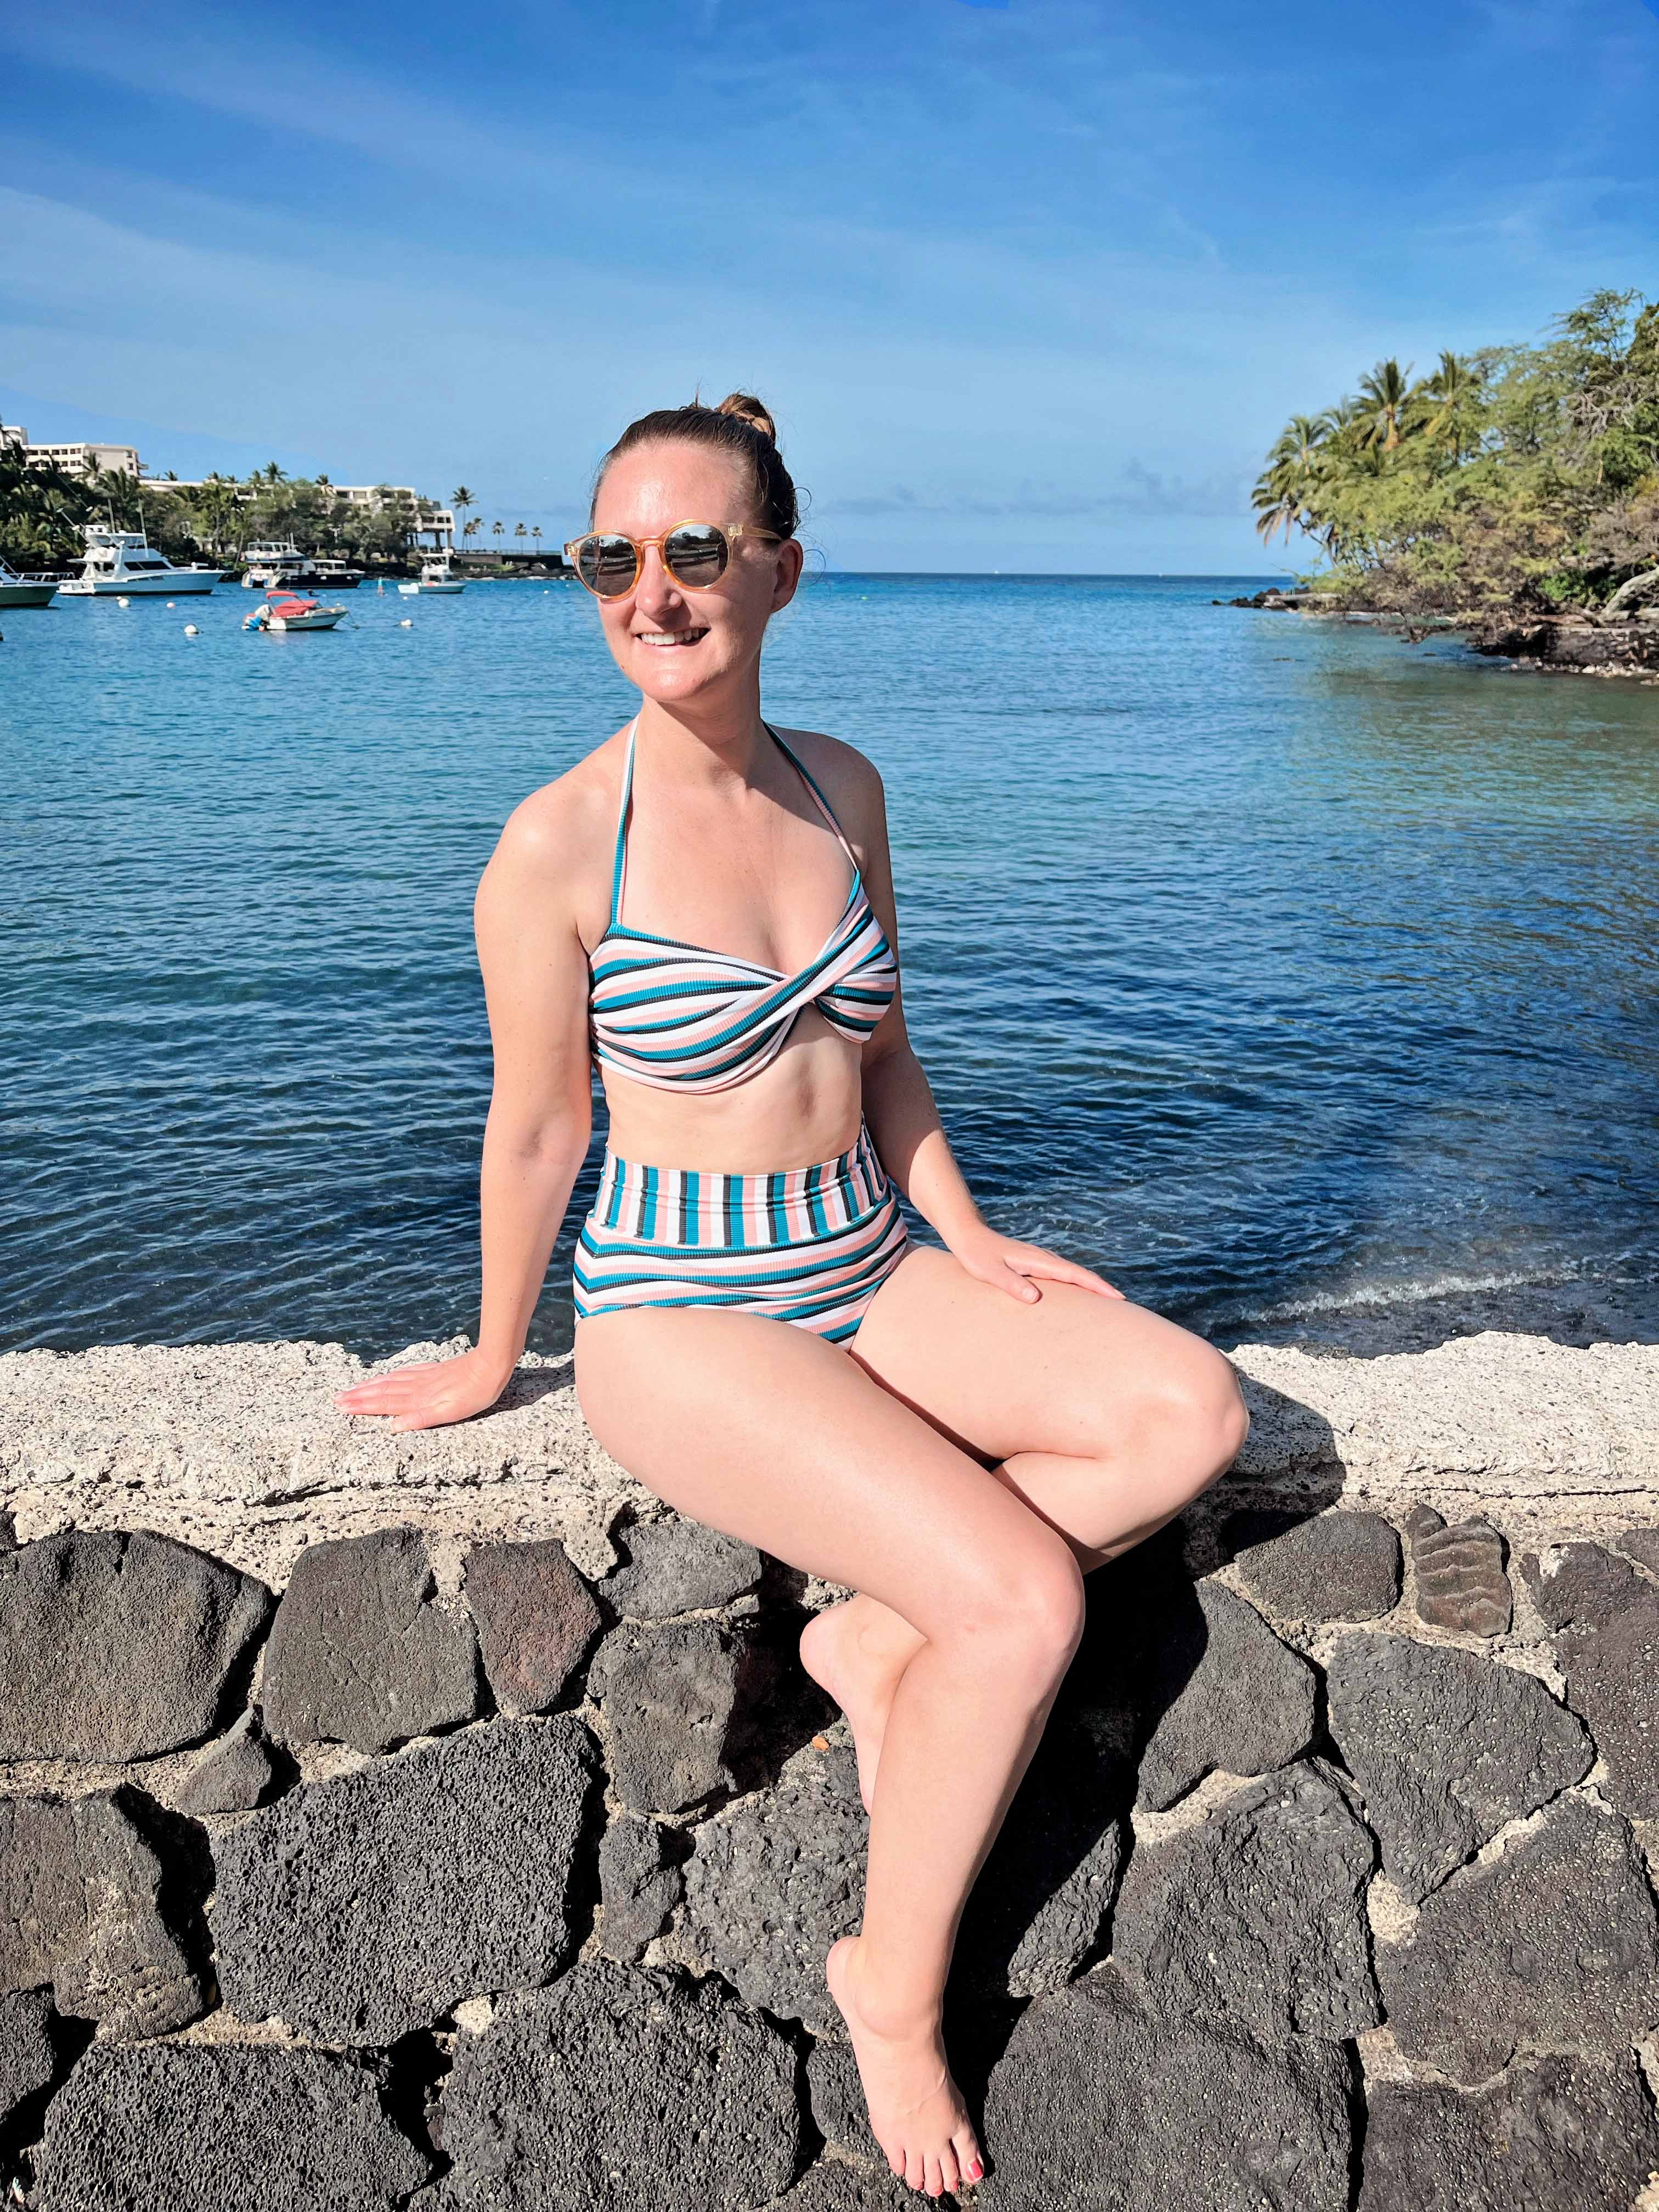
Pattern: BurdaStyle Bandeau Top 05/2014

This was one of my first successful swim tops, after about five years of sewing them. While the pattern directions are sparse and typical of Burda, I had less trouble with them time around. As with last time, I added swim cups which give a really nice shape. I believe the original has normal straps, while this has a halter. It's not designed for lots of surf and waves, but feels fairly secure (as worn in the kayak, below). 

The bottoms are another TNT pattern - a simple front and back with a high cut. This time I also added a waistband. I also drafted a low-waist one with leftover fabric (not pictured), though those didn't feel very secure so might not work out. 

The next one I first made in 2016. 

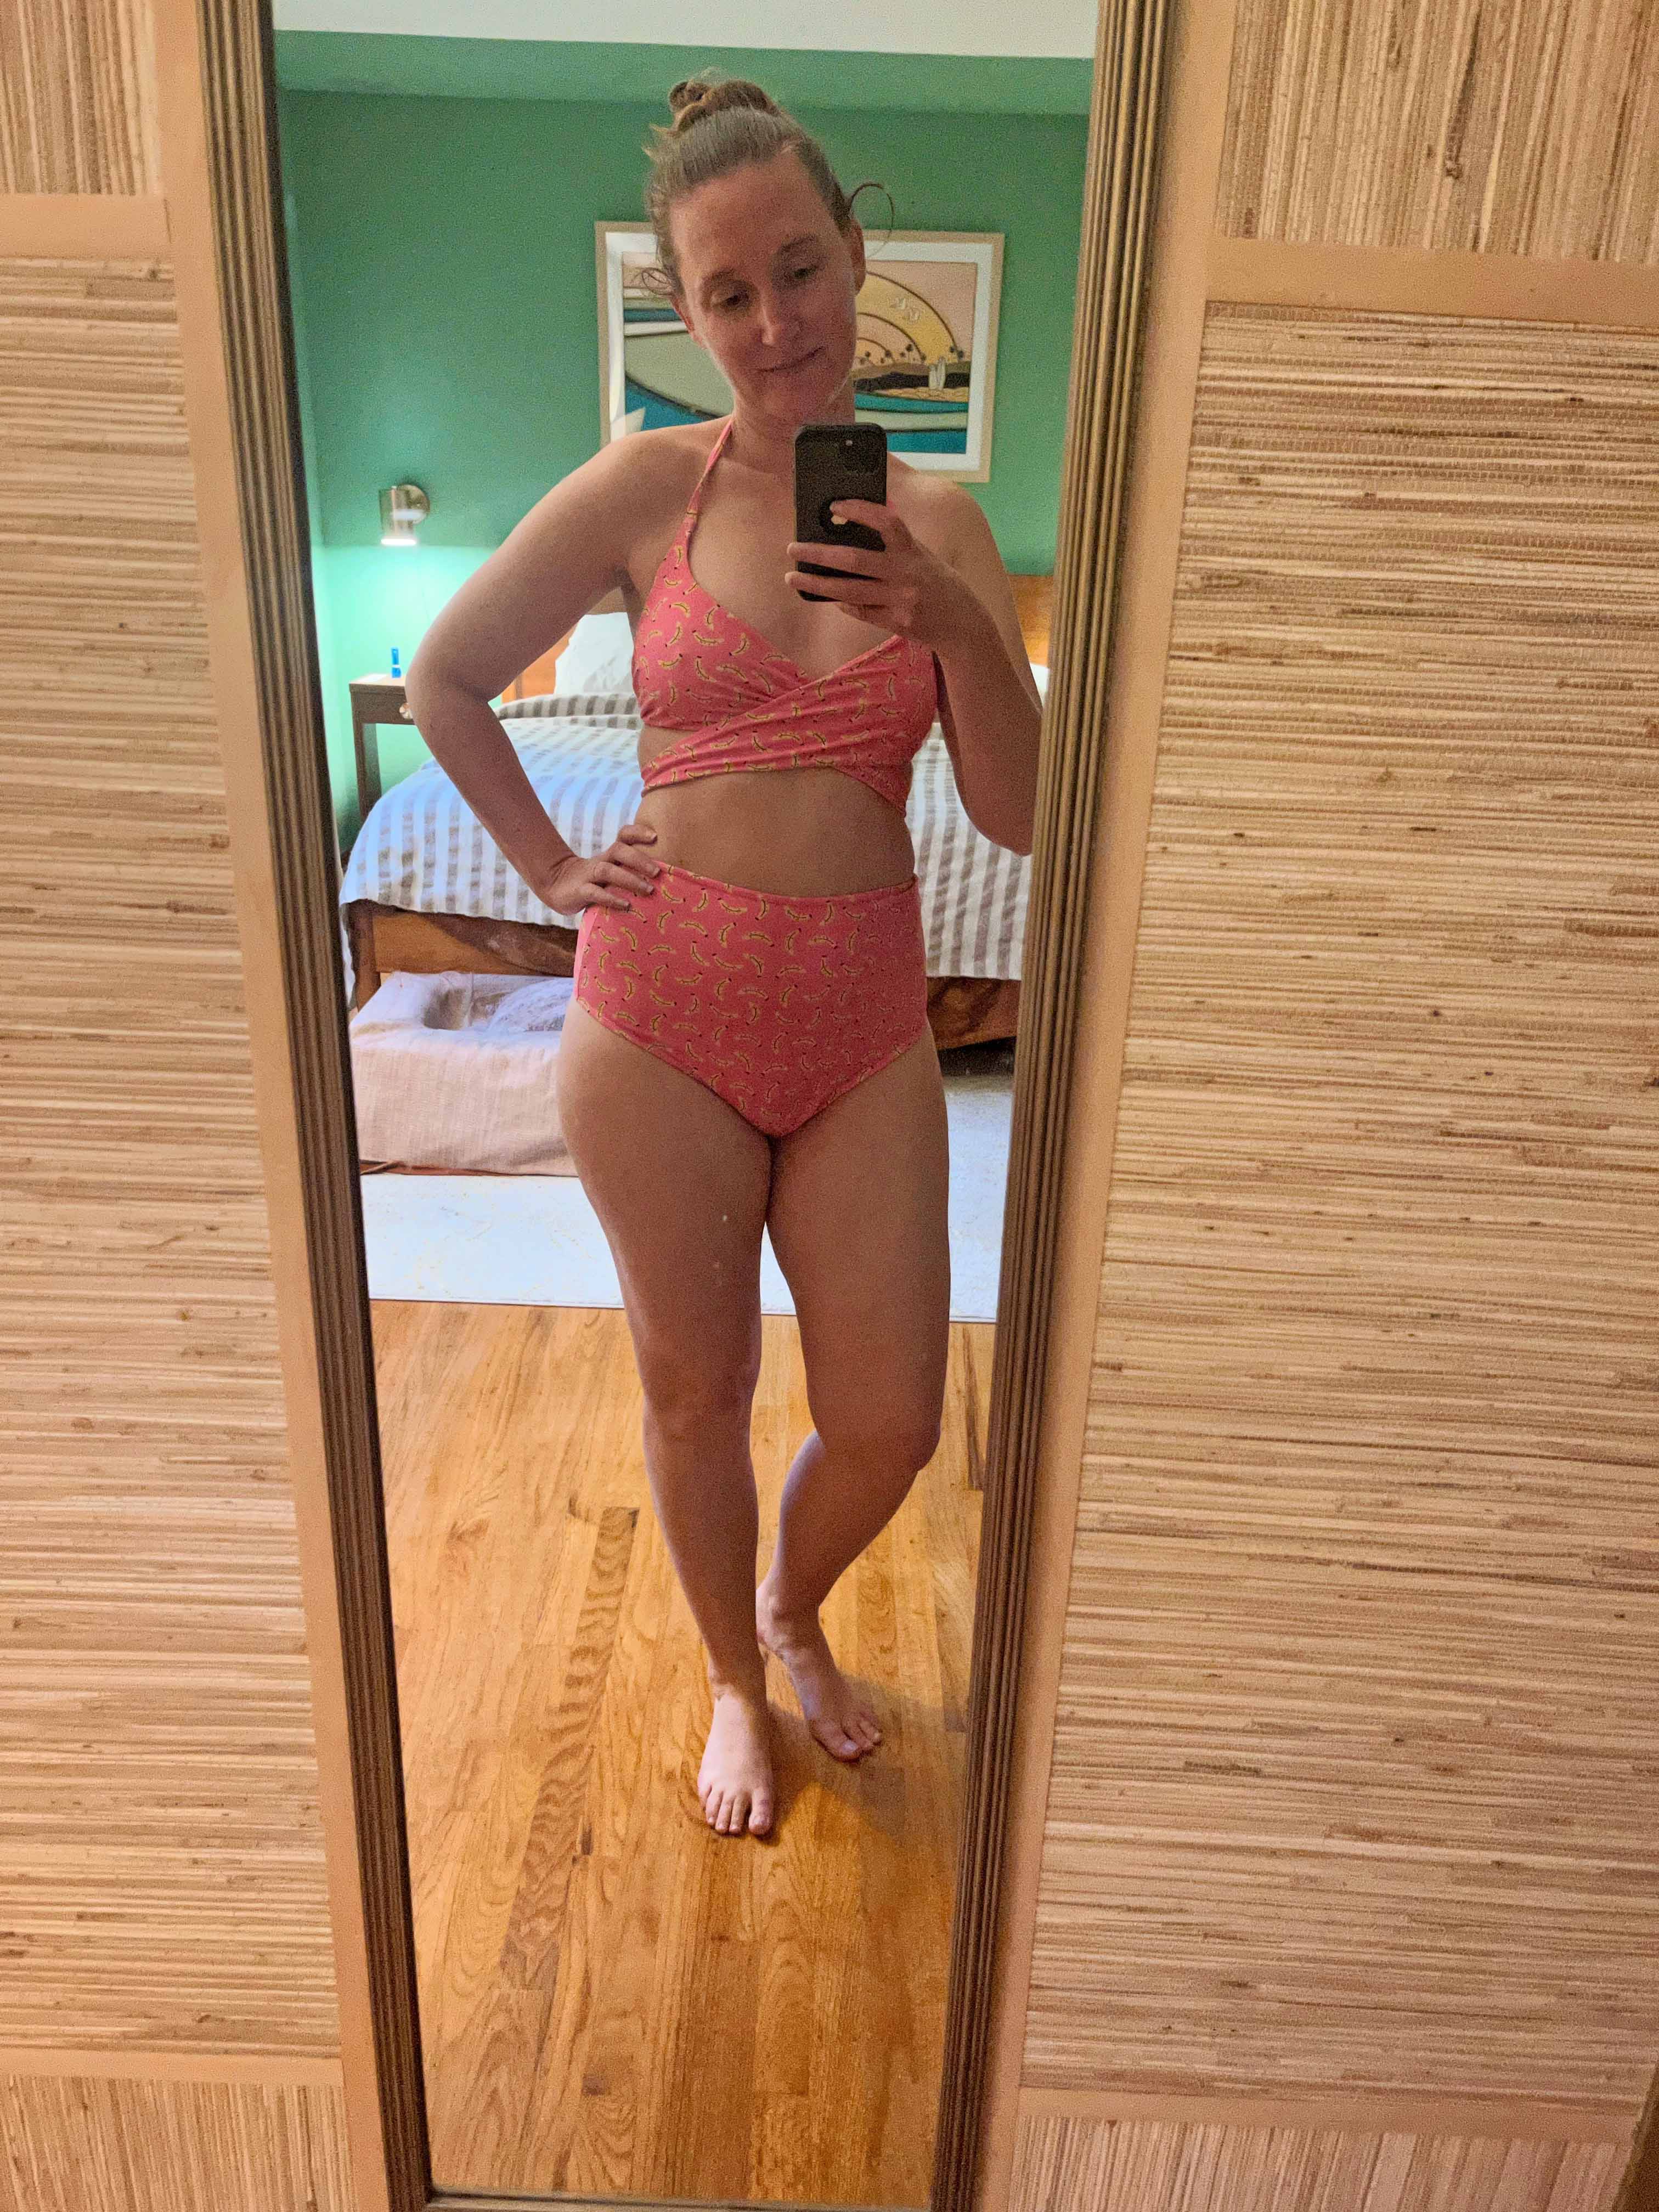
Pattern: Madalynne Sierra Bra (a free pattern!)

This one comes together fairly quickly, with a few modifications including completely lining it. Last time I made it I drafted the halter strap as one piece with the top. This time I did not (in order to make it easier to line), but didn't have the cleanest results. Regardless, this is an easy style for me to wear and gives a good shape. 

Same bottoms as before. I had originally tried the Edgewater Ave Oakley Bottoms, but realllly don't like high cut legs on me. As with the other, this also had a low-cut version with the leftover fabric (not pictured) that worked out fairly well. 


Finally, I tried one new-to-me pattern that I really liked. 


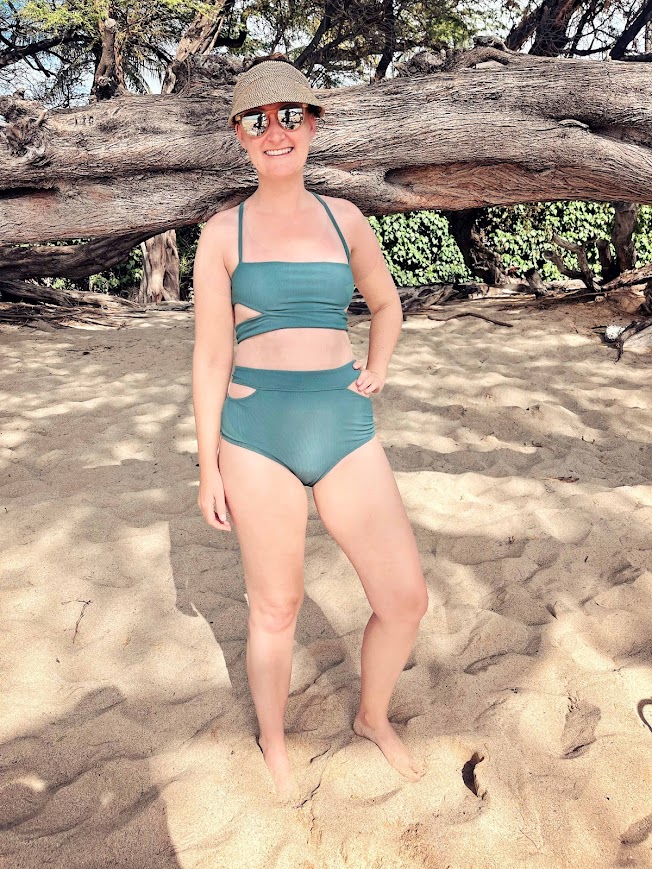
Pattern: Luciolons Cassis swimsuit (maillot de bain Cassis)

Someone on Reddit described this suit as their dream pattern and I have to agree! I love that it is covered up but still shows a bit of skin. It's got something very French about it. I actually worried that the top would provide too little coverage with the low cut and the cut-outs under the boobs. I do not recommend if you are more endowed. That said, I really enjoyed it and it worked out well on me. I takes a little fiddling with the straps when I put it on but then stays in place. 

As I looked up bathing suit bottoms online, one thing I had trouble with was getting a good idea of how cheeky the backs were cut. Several patterns out there have multiple options cuts, but often don't identify in the photos which is which. The same goes for people's posts on Instagram. And many don't post pics of the backs at all which is... understandable. So here's my contribution to the internet: this is the cheekier of the two options. 


I'm back home from the delightful warm weather now, but it's finally starting to heat up at home. I'm fully restocked ready for summer!

Handmade Kayak Paddle Jacket

Since moving to Santa Cruz, my favorite new toy by far has been the second-hand kayak we scored on Craigslist. It has more than paid for itself this past fall and, after a short break in December and January, I had it back on the water in February with my mom and Beatrix, and my dad alongside us in his rowboat. The otters of Elkhorn Slough have been phenomenal. 


Pattern: Jalie Maxime Jacket
Fabric: ripstop nylon and nylon rainwear
Cost: free - remnants

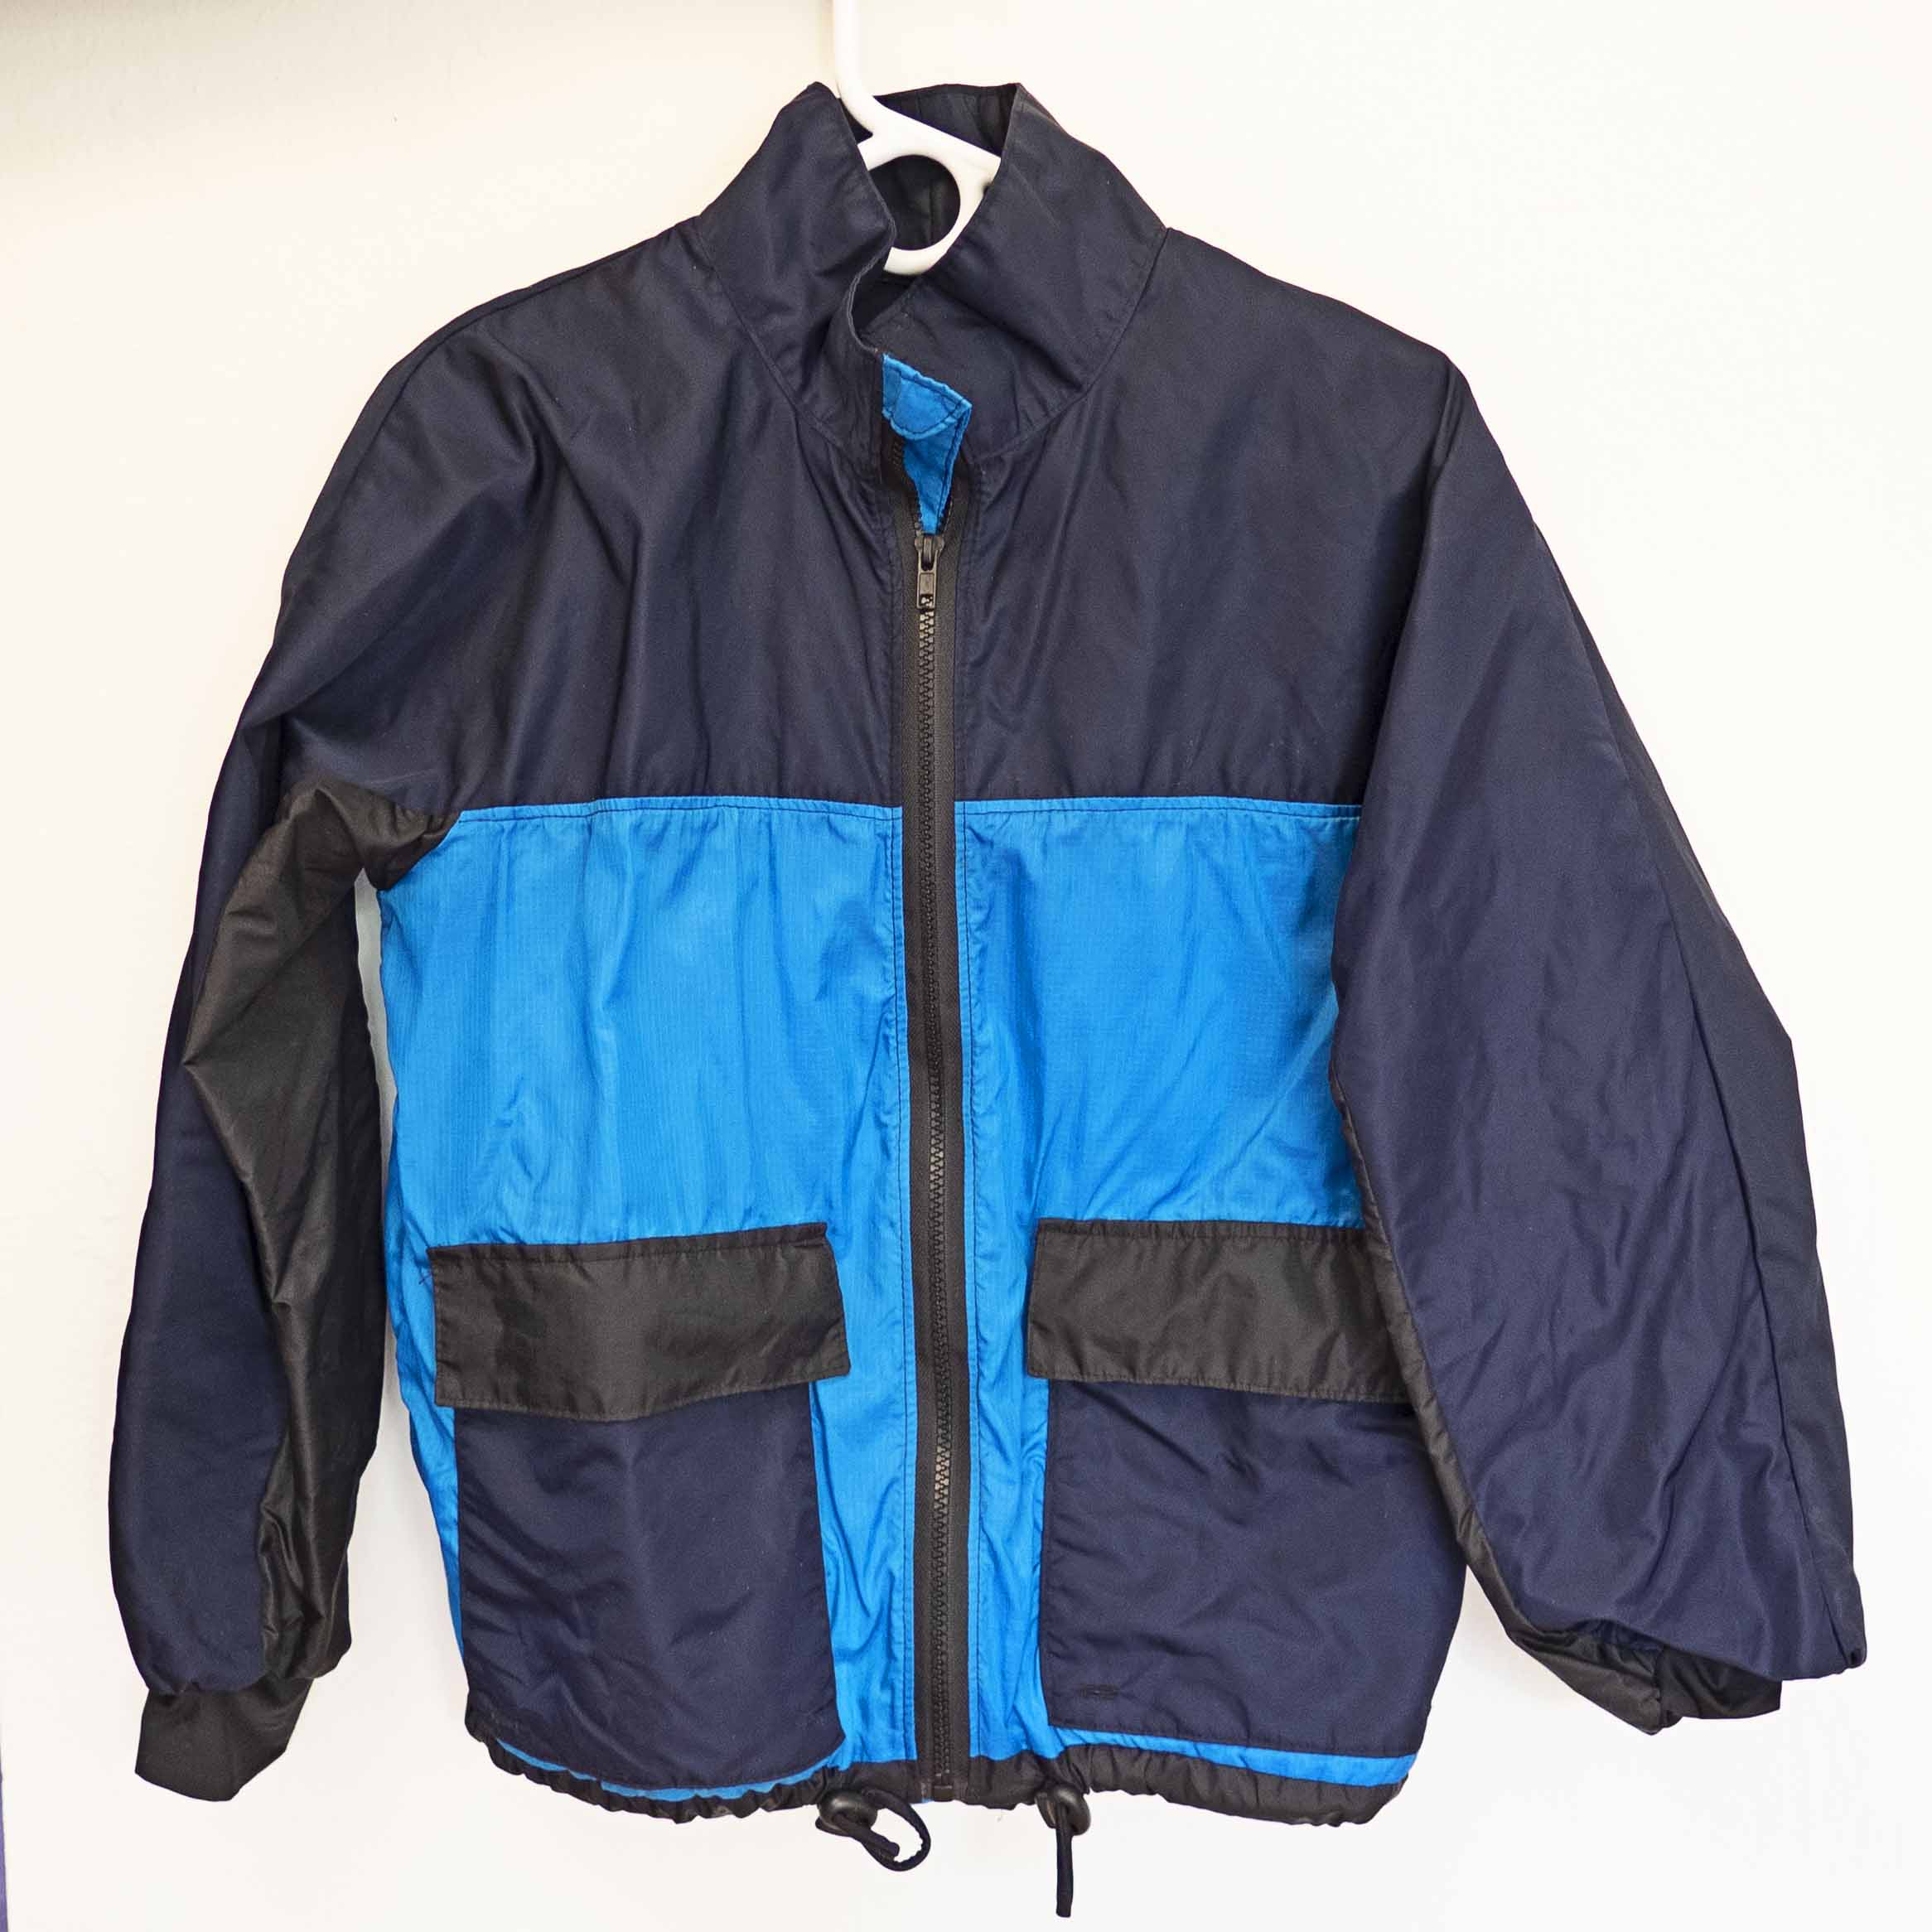
I wanted a new paddle jacket for the cooler months in spring, so I decided to see if I could make my own. After some research, I downloaded the Jalie Maxime Jacket. I liked that it was designed for athletics with things like a zipper shield, chin guard, and elastic cuffs and hems. I also wanted one with a front zip because temperatures can change quickly when you're paddling and I wanted to be able to cool off a little if I needed to. 


The jacket is made entirely with fabric from three different water-repellant scraps I had laying around. The sleeves and upper body are made from my most waterproof fabric, a water-repellent "aviator flight outdoor satin" (whatever that is?) that I used in my raincoat. I modified the Jalie pattern so that the jacket yoke and upper sleeve were cut in one piece, similar to McCall 6531. I also eliminated the pleat there. The body is made with light blue ripstop nylon, which isn't totally water-repellant but dries quickly. And there's even some black ripstop nylon filling in over the rest of the jacket. For the sleeve cuffs, I opted to use poly spandex (swimsuit fabric) to make a cuff that fits tightly to my wrist to help keep water out. Since they're stretchy, I can also push up the sleeves when it gets a little warmer. Finally, I used a stretchy cord rather than elastic at the hem of the jacket. 


Here we are out on the water and it worked well! It keeps me dry from splashes and also dries quickly in the sun. Not bad for a bunch of scraps from my cupboard! Since this is a water jacket, I sewed small buttonholes at the bottom of each pocket to drain water if needed. But mostly the jacket just gets some ocean spray. 


Aren't the otters just amazing? 


Railroaded

I think I've wanted a pair of railroad stripe denim pants for nearly as long as I've been making pants. This past weekend, I finally did the thing. Photographed on a railroad track, naturally.


Pattern: Fayma's Nightly Walk Pants
Cost: sponsored

The impetus for these pants came about when an online fabric shop, Modes4U - a company now based in Singapore that sells everything cute and kawaii, reached out to offer some fabric. Even if cutesy prints aren't your thing, I found they had a wide range of fabrics in my style, from Kaufman denim to Art Gallery knits. And, of course, the fabric I have had in and out of my shopping cart for ages - this amazing railroad stripe denim

I typically sew with stretch denim (10% or more) so was a little wary of using something more rigid. However, this denim is only 6 oz and feels very soft. The pants sewed up beautifully and are really easy to wear. They even have a little spandex in them. I actually ended up walking a few miles to take photos (and go on a dog walk) and they felt great. 

To get that comfy faded look, I used the "wrong" side, which has the appearance of a lighter wash. I did an extra wide hem (4") so they would work folded at the cuff as well. And stripes are always fun to play with, so these pants utilize the stripes vertically in the legs, horizontally on the waistband, and diagonally on the back pockets. They have double belt loops in the front and crossed loops in the back. 


For these pants, I also had the opportunity to try out Fayma Patterns, who reached out around the same time to offer me one of their custom patterns. This is my first time using Fayma, and what's interesting about this company is that each pattern is uniquely fitted to you. To get your pattern, you submit 35 (!!) measurements and two photographs (front and side) and they generate something just to your measurements.

I was honestly a bit skeptical about how well this would work. If you've followed my blog for a while, you know that I love pants and find them equal parts fun and challenging to fit. The idea that a company could produce something for all my unique fitting challenges was intriguing, but I didn't really think it would work. 

However, I was pleasantly surprised by the results. My muslin was really well balanced, with the side seam hanging straight down my leg. There were no odd wrinkles at the front or back crotch, which is a common problem area for me. And they fit my legs well, from the curves of my hips, thighs, and calves. It does help that this is a less-fitted design, but really it hung very nicely. 

The one problem area, which you can see on the models on their website, is that the crotch is drafted to be a bit low. This probably makes the pattern fit on a wider range of bodies, but it's lower than it should be. I raised mine at least an inch, but probably need to fiddle with it a bit more. So it doesn't hang as nicely there on me as it should. For my final version, I also ended up reducing the wearing ease and tapering the legs somewhat, but those are more about my personal preference for the pants I wanted to make rather than fit issues. Next time I will probably also lower the rise, as these sit at my actual waist - something few patterns usually do as I'm really long-waisted! I really am quite happy with how these fit right out of the printer and definitely plan to use this pattern again. 


All the kids tell me that skinny jeans are out, so I hope this looser style will serve me well. And damn are they comfy. 

October Days Sweater

After knitting for nearly two decades, I think I've finally timed it to actually finish a sweater in the fall. And, more importantly, I'm finally figuring out the types of sweaters I'll actually wear. 


Pattern: October Day Sweater by Masha Zyablikova
Yarn: 8 balls of DROPS Kid-Silk from Garnstudio in rust
Cost: $70

Learning to knit, I gravitated toward chunkier yarns that were easier to work with and came together quickly. However, over time I've become more interested in complicated stitch patterns. I liked to think that I was getting better and making nicer sweaters. Still, they weren't always getting worn. Made in worsted wool, cotton, or even acrylic, I realized most of my sweaters were HEAVY. They felt like a lot to wear, were often too warm, and were not always made in the best quality yarn. 

Recently, after making a t-shirt from sock yarn, I've decided the key is to knit lighter, smaller gauge sweaters that are more wearable. I've also started investing more in nice yarn for my projects. This project is a combination of both those things and I've actually found myself wearing it quite a bit!


The sweater is a modified version of the October Day Sweater. I made it in the recommended yarn (DROPS Kid-Silk from Garnstudio) which is 75% mohair and 25% silk - fuzzy, soft, and really light! I'll admit that the first time I tried on this sweater I felt a bit like a yetti, but after fixing some fit issues it feels much better. 

This is the rust color, which I had a really hard time tracking down but eventually found it on Etsy and got it shipped from Lithuania. This pattern has you knit with two strands together, which knits up quicker than I thought given how small the yarn is, but the end result is still really lightweight. 


The October Day pattern is really beautiful. I was inspired to make it by a sweater in the Spring 2019 collection from Delpozo, which has a similar lacey leaf pattern. To adapt this pattern to look more like the inspiration, I gradually faded the leaf pattern into stockinette rather than carry it through the entire sweater. Either way it's a fun piece to knit and the lace is really beautiful. 

Other than changing the lace pattern, I tried to follow the instructions closely. Admittedly, they were a bit of a challenge, owing in part to the fact that they're translated from Russian. Some of the things just don't quite make sense or aren't written the way I'm used to. However, I took my time and eventually figured it out. It's a bottom-up pattern with the top knit as a yoke, which allows for a mostly seamless construction.


I'll leave you with this final view at sunset overlooking the cliffs near our house. It's so beautiful I even ventured out in public with my tripod to capture some pictures. Even though it's November it was over 70 degrees out with people playing in the waves down below. 

Now to start knitting some Christmas stockings!

Last of Summer with the Lawren

As our first winter storm rolls through, I'm sharing the last of my summer sewing - another bathing suit!


Pattern: Madalynne's Lawren Bodysuit
Fabric: 1 yd printed spandex +  nylon-spandex tricot and nylon-spandex power net
Cost: $25

The star of this garment is this amazing printed spandex I found online. It has a vintage, rockabilly ocean feel to it. Clearly it wanted to be a bathing suit, and I had the perfect trip to Vegas to show it off. Unfortunately, we decided to cancel because of Delta and so it sat in the closet for a bit. 


After some re-thinking, I decided to make it up in the Madalynne Lawren Bodysuit. I had ordered a coordinating solid navy and mesh fabric to go with it, and the Lawren offers a lot of opportunities to play with the different fabrics. 

The Lawren was originally designed for lace fabric, so I had to make a few modifications. Whereas lace has a beautiful scalloped edge, I had to add a seam allowance to the front edges of my pattern pieces so that I could fold the raw edges under as I sewed. I did leave the mesh leg ruffles unhemmed as they lay flat just fine. Rather than scalloped lingerie elastic, I finished everything with cotton swim elastic and folded it under.


Madalynne has a wonderful eye for beautiful lingerie and the cut of this pattern is very flattering. It conforms nicely to the curve of my back and I really like the sexy cut of the legs and the sheer front panel. 

Her execution, on the other hand, can be a bit sloppy. There were a few places where the pattern pieces don't match up well at all: the back crotch is nearly half an inch wider than the front it attaches to, and the crotch lining is the width as well. And the seam lines where the top half meets the bottom at the belly button don't line up, even on her pattern sample photos online. She also doesn't include garment measurements for how tall the piece is. I'm 5'7" with a long torso and should have known better, but I had to re-cut the bottom piece and extend it nearly 2 inches to fit. 


Despite these challenges, I had a lot of fun making this using my coordinating fabrics and it was relatively quick to sew, even correcting for some of the pattern errors. I'm hoping it provides a bit of sun protection to my shoulders, and it has already served me well out in the kayak. In fact, it was so warm when I took these photos that I took a quick dip and it works nicely for a swim, too. Here's me having what felt like a "Bond girl" moment. 


A Jumpsuit for Stepping Out

This jumpsuit is made for showing off. Its sewn from bright red linen, has hand-embroidered flowers, and shows just a flash of skin. It is also very much a product of the pandemic, made from fabric I ordered online and couldn't think of any other use for and hand-stitched embellishments that took me over a month to create. Today, two weeks after my final vaccine, I'm ready to celebrate! (Safely, of course.) 

Pattern: adapted from McCalls 7789 and McCall's 7719
Fabric: 2 yds Robert Kaufman Essex Linen
Cost: $40

For this piece, I think I spent about as much on embroidery thread as the fabric itself. Kaufman linen is fairly cheap (which is how it ended up in my cart) and I got two yards for less than $20 online. However, when it arrived it was much brighter than I had pictured, and I just wasn't sure what I would use it for. As my stash dwindled during the long months of lockdown, I finally decided it needed to be sewn up. 

The fabric told me it wanted to be bright red overalls like the Closet Core Jenny Overalls. But while I liked that pattern, I also wanted something that could be worn without a shirt underneath - maybe something more like a pinafore. I eventually ended up mashing together the pants from McCalls 7789, which I've sewn twice during lockdown already, with a bodice from McCall's 7719 squared off at the neckline. It required a fair amount of adjusting as I sewed and I think the bust darts ended up a bit high, but luckily the embroidery hides that and I really like the final results. I really like the overall shape and that it provides enough coverage while still giving the pinafore/overall look. 

So back to the embroidery. To temper all that red, I thought it would be fun to add some flowers to the bodice. I was also running out of knitting projects and needed something to do while I watched TV, so this was the perfect activity to occupy my time. As I've only done a few embroidery projects every, I used this as an opportunity to try out a bunch of different techniques and had a lot of fun browsing the internet for different petal and leaf designs. 

The one thing I have a hard time with in embroidery is picking out the color palette. So I looked around for a curated palette of colors. Sublime Stitching sells some amazing ones but they were almost all out of stock at the time. I finally found this fall palette I liked on Etsy. I really wish more sellers did this because it makes everything feel much more cohesive. I did run out of a few of the colors but was able to just order more of the single color online now that I knew what to get. The colors are give it a really vintage feel that I like. 

The jumpsuit has a low back and I really wanted the straps to cross in the back. However, the length of the straps coupled with the size of my hips meant I could barely wiggle out of it. I left the project alone for the night and came back the next day to uncross and re-sew the straps. As it's already a bit of a delicate garment, I really didn't want to strain it every time I needed to get in and out of it! I had to use the bathroom several times the first day I wore it and I was glad for the change. 

It also has pockets, so despite its delicate touches it is really almost a practical garment.


While the fabric purchase felt like a bit of a mistake and the process for making this was very experimental, I am so happy with the final result! The color, shape, and embroidery all come together to make a happy garment ready to step out in.  

My Parklet Jacket

If you live in the Northern Hemisphere, you may be wondering why I'm posting a heavy jacket in the middle of May. But it was 55 degrees and windy last night in San Francisco as I did some outdoor dining and I can assure you that this jacket will get a LOT of wear. In fact, I've been wearing this every weekend since I finished it earlier this month to outdoor meetups with friends. 

While I am hopeful that COVID is winding down for now in the Bay Area (and I am now fully vaccinated!), we have been doing most of our socializing outdoors. It's been wonderful to connect with friends, some of whom I haven't seen in many months. And amid all of this I realized that the cute tops and dresses I've made over the past twelve months were not going to cut it for a chilly night in a bar parklet on Telegraph. So my parklet jacket was born. 


Pattern: McCalls Misses' Unlined Jacket #6531
Fabric: 4yds Robert Kauffman Big Sur Canvas in Canyon Brown
2 yds Minky Luxe Cuddle in Heather Henna
Cost: $125

I went all out with this jacket. Stonemountain was having a sale on their Robert Kauffman Big Sur Canvas so I ordered a few yards of that along with matching thread, snaps, zipper, cording, and cord stops. The matching thread felt like a real treat as I almost always just sew with black/white/gray. I'm glad I did it though as I did lots of topstitching and the matching color gave a really professional finish. And the option to have them match it for you when you order online takes all the guesswork out of it. I only wish I'd realized that they send 200m spools - I needed to go out and pick up some more. 

For extra warmth and luxury, I decided to line the whole thing in sumptuously soft minky fabric. I've always wanted to use something like this for an extra cozy jacket and I'm glad I did. It feels like wearing a teddy bear. 


For the pattern, I dug in my stash and came up with McCall's #6531, a loose-fitting, unlined jacket that has a sporty/parka look with rolled sleeves and the option to cinch the neckline, waist, and hem. It wasn't until I was ready to cut it out though that I realized I had a larger size range than I needed. I think I must have gotten this pattern at a swap and either didn't notice or didn't care. Luckily, the pattern pieces were pretty basic and I was able to grade down one size. Because it's a loose-fitting style, I wasn't particularly worried about getting the fit just right.

One reason I chose this pattern is that it has cut-on, loose-fitting sleeves. They are kind of a batwing or dolman style. Because I was using a bulky lining, I knew this style would be better for accommodating all that fabric than a traditional, close-fitting set-in sleeve. The pattern does not include pieces or instructions for adding a lining, but I found it was easy enough to do by cutting out the regular pattern pieces except for the collar and cuffs, and shortening the hems. 


Before I make up a new pattern these days, I like to read Pattern Review to see what others recommend. Many said they ended up sizing down, but I was glad that I cut the size (or close to it) for my measurements. This gave me enough room to add the bulky lining fabric and not worry about whether I'd still be able to get it on. Funny enough, many people also said the sleeves were too short and they had to lengthen by two inches or more (!). I'm not sure if it was because I was grading down from a larger size range or if I just have short arms, but the sleeves were plenty long enough for me!


One fun thing about this jacket is that it is designed so that you can roll the sleeves up. I knew that mine wouldn't roll quite so nicely in thicker canvas, but I still like the option for the hours before the sun goes down. I cut a facing from the canvas so that the minky lining wouldn't show through (and it meant less bulk). My one gripe is that the cuff closure for this jacket is just made by overlapping the cuff pieces. I think this could have been done more elegantly, but oh well. I also wish they included more snaps in the notions list for the cuffs (they recommend buttons instead) and for the pockets. I luckily had a few extra snaps in my stash for the cuffs so was able to add them here. 


Now I have the perfect casual jacket for the lake or a parklet bar. The only problem is the Mr. has one in a lighter shade of canvas and is a little annoyed that I had to have one for myself ;)

Green Blazer for the Good Times

Remember a few years ago when everyone was building their wardrobe and trying to make clothes for the way they live? More cake less frosting. Becoming a wardrobe architect. All that jazz. Well, one year into the pandemic and I have no interest in sewing for the way I'm living. I have been feeling so unkempt in my sweatpants, no-makeup, and ponytail. So I'm dressing for the life I want. And somehow that life involves bright lips, clean hair, and a forest green blazer with rolled cuffs. 

Fabric: 2 yds Robert Kaufman Ventana Twill in Dark Green
Cost: $30

Do I need a blazer right now? Absolutely not. But when you're bored at home it is the perfect challenging project. Also, if things ever do open back up, this will be nice for dressing up a bit or even more casual work meetings. I just love a good green!


I wanted to make a blazer because I love being able to roll my sleeves up. But if you've ever tried this on a normal jacket you'll find that it is quite difficult if the sleeves are too small at the wrists. To adjust this pattern, I found the widest part of each sleeve piece and widened all the tapered lines to match that width. So the sleeve is no longer tapered and rolls up really nicely. It makes the sleeves look pretty big and I thought I might have to take them in some, but this is really how much fabric you need if you want to be able to roll them up. 

I used my old standby pattern for this blazer, McCall's Palmer Pletsch Misses' Jacket #6172. I believe I bought this in 2010 and have been making great-fitting blazers with it ever since. Surprisingly, it is still for sale on the McCall's website. My friend Beth the jacket queen even named this as one of her favorite blazer patterns, so you know it's worth it. And if you're looking to brush up on your jacket-making skills, she offers classes at Hello Stitch studio


One other change I made to this pattern was to change the welt pocket to a sort of patch pocket that sits neatly between the side seam and the front princess seam. The truth is, I'm really not that good with welt pockets and wanted to try something a bit different. I also think it helps make the blazer a bit more casual.

I also haven't added a button yet. Maybe I'll leave it this way? 


Some people choose unlined jackets because they think the construction will be cheaper than making a lining. But I find that you spend so much time on nice seam finishes (which will show when you take the jacket off) that it is almost certainly quicker to line it. So of course, to take up as much time as possible, I did a mostly unlined version with bound seams. Not only did this give me more project to work on, but it also meant I could work with the materials I had on hand and not have to buy more lining. I lined the sleeves in a leftover lighter weight twill that turned out to be almost an exact match. The other seams are bound in a combination of black and black and white bias tapes that I had on hand. It was the perfect way to use up leftover materials. 

Here's another shot of the inside. You can see all the bound seams in more detail, as well as the sleeve lining. All the facings were hand sewn to the garment, and the sleeve was hand sewn at the armhole. 

I hope I find a time to wear this soon. In the meantime, I'll be dreaming about the life I want. 

Slowly Sewing

To be perfectly honest, for the first time in the 10+ years I've been sewing, I haven't wanted to sew. A year into the pandemic, I blame quarantine. Never before have I had so much unlimited time to sew. It was fun for the first few weeks. It kept me entertained for many months. And now... I've sewn it all. Couple that with nowhere fun to wear your creations and it's just... not that interesting. I'm slowly picking up projects again but also giving myself the space to nap, take dog walks, make waffles, whatever mood strikes. 

BUT I still have a few things photographed that I want to share with you, so you'll see that dribbling out until I get my "sewjo" back. 

Pattern: Victoria Jones's Waimea Ranch Shirt
Fabric: remnant chambray
Cost: gift

First up, my favorite button-up shirt pattern, the Waimea Ranch Shirt. I've written about it before, but it's the perfectly relaxed fit shirt with just the right amount of shaping. Just check out the back, which has those nice little fish-eye darts that nip in the extra fabric right where it's needed. 


And those pleated sleeves.


I got a little obsessed with the demin details on this one. I used red thread to do double lines of topstitching throughout (which I now realize is why I'm out of red thread). I also did flat-felled seams and have to admit that this was probably the first time I've EVER used flat-felled seams on a garment. I normally default to French seams as I find flat-felled seams to be much too finicky. They were a bit finicky but mostly worked out well.   


I did make one alteration to the pattern, which was to convert the pointed front and back of the yoke (more of a Western style) to straight seams. That makes this pattern much more versatile for me. 

I used leftover denim shirting from another project, turning it inside out to get a bit more of a worn/bleached look. 

The shirt has snap closures on the front and cuffs. But I messed up an got the from Amazon and they're already popping off all over. So I'll probably have to replace them at some point which is such a pain. 

I do love a good denim shirt though and hope I get some wear out of this when the weather warms up. 

A Tale of Two Sweaters

Can I tell you something? I made this sweater twice. Well, not this exact sweater. But I used this yarn and knitted up a perfectly fine sweater and then completely frogged it, all seven skeins of yarn, rewound them, and knit up another complete sweater. 

I bought this yarn on the last day before lockdown orders came out in March last year, knowing that I'd need a Project to work on. I finished the first sweater in October, then fully eight months into the pandemic. And in that time, the pandemic really made me take stock of what matters: relationships, self care, patience and joy. And, among other things, I have realized that life is too short for sweaters that you won't wear. I loved the bobbles and details, the months I spent working out the stitch pattern. But the whole thing just felt too heavy, too awkward. I'd pull at the neckline every time I wore it. So I took it apart. 

And you know what? I love my new sweater. It is the exact same yarn (plus a few more skeins) but the fit is so much better, it keeps me perfectly warm in my wintery apartment, and is easy to pull on and off and to wear. It's the little things like this that are getting me through the year. 

Yarn: Cascade Yarns 220 Superwash Wool in black
Patterns: Version 1 based on Caron Great Curves Knit Poncho
Cost: $140

Let's start with the first one. I love intricate stitch patterns and have spent a lot of time pouring over my copy of the Japanese Stitch Bible. For this project I was especially intrigued with the delicate lacy patterns that hid within them increase rows, allowing a pattern to expand as you work it. I spent months translating this technique to a shawl sweater pattern with raglan sleeves, using the knit stitches to create the narrow neckline and then growing wider as I worked down. I figured the whole design out in Excel, using the rows and columns to record each stitch. It was incredibly challenging and interesting work, and really held my attention. 

However, as is often the case when I try to create my own knit patterns, the end result is often not as wearable as I'd like. I find it much more challenging to work out necklines and sleeveheads in knitting than in sewing patterns. Living in a warmer California climate, I also struggle to match my knitting projects to what will actually get worn. 

While I wore this sweater poncho a few times, it never felt quite right. The whole garment felt heavy and cumbersome to put on over my head. It was also a bit unbalanced and would pull toward the back, chocking me a bit at the collar. While I loved the artistry and the process of creating this garment, the end result was lacking. So I snapped a few pictures to document my work and began the tedious process of taking it all back apart. 

Unfortunately, most of my knitting projects end this way. I've even knit a sweater twice where I didn't like the first or second version. However, I was determined this time to get it right and started researching knit patterns, which I vowed to follow to the letter. Up until this point, the only sweater I have ever really loved is the one I knit for my husband, the Brooklyn Tweed Hugo Sweater. So I decided my best bet was to try another pattern from them.

I eventually landed on the Watermark pattern. The instructions matched my yarn gauge and, with its open, pull-on style, it seemed like an easy pattern to wear. While I struggled a bit at first with the instructions, I found it to be a really quality pattern with well-thought out details. And you know what? I love it! It works well with my yarn, the fit is good and not too snug, and I have been wearing it nearly every day since I finished it. 


While I tried to stick faithfully to the pattern to achieve the best possible result, I did make a few adjustments. First, I found that my yarn gauge knit up slightly larger than what the pattern called for (even on smaller needles), so I knit the smallest size, realizing it would come out a bit bigger. However, when it came to the armholes, I made them two sizes larger and knit the sleeves two sizes larger to match. This worked really well for me, creating a cozy sweater but with enough room in the arms to wear with long-sleeve tops. I do believe they sized up the sweater for the models so it was hard to determine how snuggly the pattern was supposed to fit, but this solution suited me. 

The other thing I did was shorten the pattern. Again it was actually kind of hard to tell where the hem fell on the models from the pictures, but after looking at several Ravelry projects I decided to shorten mine by about 2-3 inches. I did this by starting the waist decrease early. Of course now I can't remember exactly how many inches I took off (was it 2? was it 4?) but it hits me now right at the hip. 

The stitch pattern on this sweater, while not quite as cool as the Japanese Stitch Bible, also added some visual interest and was fun to knit. It is seen better on the back of the sweater. 

The only challenge I had, and you can see it in the photo above. Was with the yarn dye lot. When I was making this sweater I realized I would need a few more balls of yarn and, now that in-person shopping at limited capacity is back open, went in after the holidays to pick up some more. I carefully checked the dye lot but realized only much later that I had only checked the dye lot of the first skein I picked up, not all of them. I do a lot of knitting at night and really only realized the color variation after I had already knit up the back portion of the sweater. Luckily, black is easy enough to fix and, if it really bothers me, I'll dunk the whole thing in some dye to try to even out the color. 

I suppose the last thing I'll note is just a word about the yarn and pattern companies I used. I was quite proud of myself for shopping local for this yarn, especially as I know retail stores have been struggling. But my friend let me know later that the particular brand of yarn I selected, Cascade Yarns, have been vocal Trump supporters and harassing others on social media. It's been a bit hard to untangle whether it was the present or former owners and exactly what beliefs they do or don't hold, but I was very disappointed to hear this. Especially with recent conversations on the topic, it strikes me that it is best to support companies that are working to make this space as inclusive as possible rather than going about business as usual or actively supporting a racist leader. Similarly, Brooklyn Tweed has recently been accused of copying and profiting off of the yarn of a local Oakland seller, A Verb for Keeping Warm. While mistakes will be made and it is not possible to have a "perfect" source for all your projects, I am reconsidering both these companies for projects in the future in favor of more inclusive companies based on what I learned while making this sweater. 

In practicing a craft I find there is always more to learn. From what projects suit me to where to source my supplies, I welcome the challenge of constantly learning and improving. 
Related Posts Plugin for WordPress, Blogger...