Showing posts with label series: Social Sewing. Show all posts

2014 in Sewing

More than just a reflection, I consider my year-end round-up to be my final verdict on all of the things I've made this year. Often things are blogged and posted before I've gotten a chance to truly wear them around, wash them, and break them in, so the year-end post is my chance to take a good look at what actually worked and what didn't. It's also fun to tally up my makes, put them all together, and see what I've actually accomplished this year. This, of course, can help set the tone for the year to come.

This year I made over fifty individual things, and managed to blog most of them. I also had the opportunity to test some patterns, guest blog, teach a BurdaStyle class, and was published for the first time in a print magazine! On the home front, I finished some planned improvements to the apartment, got our new puppy, studied for the GRE, and applied to grad school. I did not cook as many home-made meals as one should, clean the floors nearly often enough, get in shape before Hawaii, or get 8 hours of sleep every night (like tonight). Let's hope it was all worth it!

Total Projects: about 50
Average Cost: about $14
Total Cost: less than one month's rent


I should probably be ashamed to tell you how often I've worn some of these pieces. After my custom bralettes, my Hudson pants have by far and away been my most-worn item. I don't wear them much out of the house (except for the occasional dog walk), but I pull them on just about every night when I get home from work. They are so comfy, and in black they look good with anything. I have also been obsessed with my Bonnie Top, which gets worn just as soon as it comes out of the wash. It's got the comfiness of a t-shirt but still looks put together for work and meetings. My Plaintain shirt and skinny jeans have also been go-to staples, although both patterns could use some tweaking in the new year.

1. Bonnie Top
2. Summer Scout
3. Plantain Tee
4. Hudson Pants
5. Jeans
6. Bralettes: Polka Dot, Lace, Mustard


The year started out with me making a lot of tops for myself. The simple ones work well, but I am noticing they have to be a bit more special than a kimono tee to make my 'most worn' list. The Weekend Archer was a good make, and the floral blouse, though a bit tight in the underarm, proved to be an excellent TNT pattern now that I have it all fitted.

1. Silk Top
2. Woven Top
3. Split-Back Tee
4. Fave Top
5. Weekend Archer
6. Floral Blouse
Not pictured - Quilted Scout


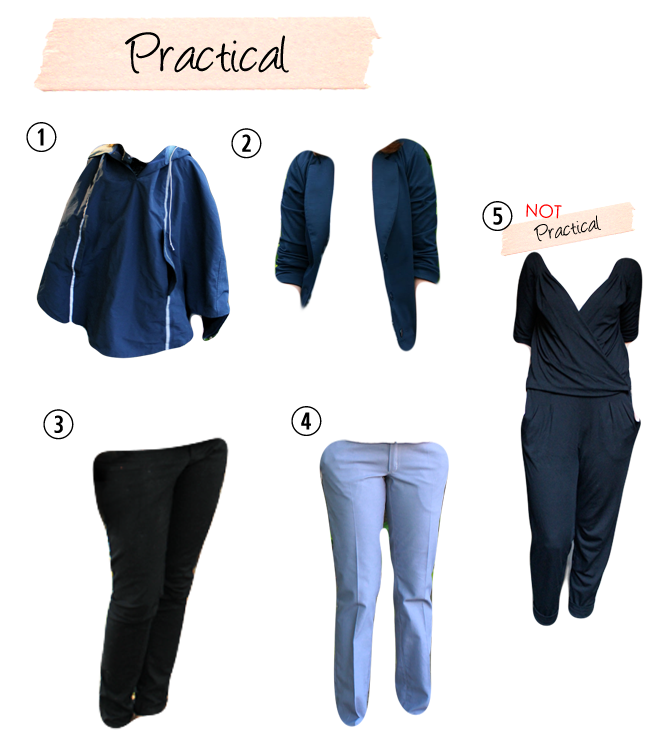
This year I had vowed to sew more specifically for work-related things, and the ponte blazer and Burda pants did a good job for that. I also managed to make myself a custom bike rain cape which came in VERY handy at both the beginning and end of the year: though silly, it makes a big difference if I get caught without it. I also made something for fun - the jumper which I wore during the holidays last year and this year. This year I want to make a few more unusual shapes, including culottes and overalls, just to push my comfort zone a bit.

1. Biking Rain Cape
2. Ponte Blazer
3. Ginger Jeans
4. Burda Pants
5. Jumper 


I continued my vow to sew fewer dresses this year, but the ones I did make got a lot of wear, especially when traveling. My Maya Dress is definitely my prettiest make, and the knit dresses were a win for comfy vacation traveling. I should also mention our matching Cal shirts here, which were pulled out for SEVERAL games and have attracted many requests from friends who want their own.

1. Maya Dress
2. Striped Dress
3. Hawaii Dress
4. Cal Shirts
5. Bathing Suit
6. Lingerie
Unblogged: Bathing Suit #2, Pajama Shorts


Towards the end of the year this year, I noticed myself making a lot of things for others, which may be why I'm feeling a bit behind on my personal sewing right now. Of course, who can resist sewing for Ms. Beatrix Kiddo? While last year I sewed a lot for Mr. Made, this year was definitely all about the pets. For baby showers, baby pants were my go-to gift, and I even got in some mens sewing with a shirt for my dad and some birthday makes for Mr. Made which haven't made it to the blog yet. 

2. Dog Coat 
Unblogged: Dog Sweatshirt, Dog Pajamas, Dog Bed, More Baby Pants, Jedediah Pants, Men's Button-Up, Scarves


My misses this year fall into three categories: poor fabric choice, fit issues, and poor design choices on my part. For various reasons, this year I had a number of my projects disintegrate after wearing. My floral archer was made from delicate vintage fabric that raveled when washed, the fabric used in my cowl top was cheap, and for some odd reason the perfectly new fabric used in my Sutton Blouse and ruffle tee also degraded after washing :( My fit issues largely came from garments that were too snug at the armpits, too loose in the bust, or both. I could try to tell you I will muslin more to avoid these issues in the future, but I probably won't. Finally, for some garments I just made poor design decisions - I chose a wrinkly fabric, or the wrong fabric, or cut the neckline too low... It's ok, I've got more in the works!

3. Cowl Top 


Goals

Overall, I think I did a pretty good job of sewing for my lifestyle, with a few lessons learned along the way. Last year I said I wanted to focus on fit and designing clothes specifically for the office or play, and I have made some progress on this front. The more I learn about fit the more I know I have to learn, but I've become increasingly interested in how the 'pros' are doing it. 

I also vowed to finally tackle the mend-it bin, and I'm glad to say I did! This had been a goal for at least two years, so I'm relieved to finally check that off my list. Of course, a new one has surfaced in its place... 

I also wanted to take on another project like bra-making and I did... to some extent. That project turned out to not be sewing related at all, however, but rather applying to grad school (which at times seemed like another part-time job). Getting back into the academic setting (or at least applying to be) got me thinking a lot about the role of sewing in my life. I realized that not only is it a fun hobby, but it also helps to balance the rest of the work that I do. While I didn't sew much during those months busy months, I have gained a new appreciation for continuing to work sewing into my busy schedule. So instead of a long list of goals for this next year, I want to focus on making sure that I keep sewing as a part of what I do, even if that time gets reduced. Looking at the projects above, I'm excited about the possibilities ahead!


Hope everyone has a happy new year! Here's to many more months of sewing ahead!


The Maya Dress

Pattern: Marilla Walker's new Maya Dress/Top
Fabric: 2 yds woven cotton 
Cost: fabric from Melizza via Kestrel's Spring Sewing Swap

Who loves a new pattern! I do! I do! This is a brand new pattern from Marilla Walker, entitled the Maya Dress/Top. It's a kimono-sleeved dress or top pattern that is designed to hang well from the shoulders and have a wide fit from the bust down, much like a traditional Guatemalan Huipil of Marilla's Central American mother and family.

It was this last fact that truly had me intrigued. Long-time followers (all four of you) know that I feel a deep connection to Central America, having grown up speaking Spanish and traveling when I could in the region. In 2009 I tried my hand at refashioning traditional Mexican dresses while living in Mexico City, and many years before that I actually had a simple Huipil made for me in Guatemala. While there are certainly many ways to customize this pattern, I love the regional and deeply personal inspiration!

When Marilla called for pattern testers, I jumped at the chance. I've been a follower of her classic, fun style, and have recently enjoyed her makes such as completely hand sewn jeans (!!), beautiful hand-printed fabric, and now this chic dress/top pattern! The garment truly reflects her casual, well-dressed style, and can be made as either an easy dress or top, with or without the button placket. I was totally in!


The basis of this dress is a fabric from the wonderful Melizza at Pincushion Treats, who was my partner for Kestrel's Spring Sewing Swap (incidentally, she also just made a wonderful Latin-inspired dress). Something about the crisp whiteness and embroidered details of this fabric just seemed perfect for the pattern. I took advantage of the topstitching at the facings, placket and hem to add contrasting blue thread. The lines aren't perfect and look slightly "handmade" but in this case I really like that aspect - it lends a sort of folksy vibe to the dress.


I plan on making this up as a top several more times - it is so helpful to have a kimono-sleeve pattern because it uses such little fabric and is very quick to make. I'm sure you've noticed, but I tend to wear a lot of these! The only thing I would do differently next time is to make it narrower at the neckline to better fit my narrow shoulders. If you aren't as big of a fan of the loose drape, you could do the same.


I don't know if B will be appearing in all of my pics from now on, but she certainly is a good model! Here she is the first time she met her BFF Hannah at the park, right in the middle of our shoot :)

Cat Pillows

Pattern: envelope pillow case (I like this tutorial)
Fabric: design by me, printed with Spoonflower
Cost: $38 for four pillows

Well, I'm baaack! After a month of studying, no sewing (no fun!), and 645 ignored posts in my blog reader, I'm happy to make a triumphant return to the sewing blog world. 

My first project back ticks the boxes for both selfless and social sewing: cat pillows for one of my bffs and my entry into Miss Crayola Creepy's Cat Lady Sewing Challenge. Who says you can't participate if you don't own cat?!

For my friend's birthday, she requested pillows of her beloved feline, Lucifer "Lucy" Chao. We were inspired by these animal pillows we saw in a shop in Austin, and so I made some up for her featuring pop-art renditions of Lucy. Each pillow has a different image on the front, and a coordinating color on the back. 

The images themselves are actually not that difficult to make. I played around in Photoshop until I found a technique that worked for me, and here's what I ended up with:


Step 1: Select photo
Step 2: Erase the background: Add layer mask - paint in black to erase/white to undo
Step 3: Desaturate: Image - Adjustments - Desaturate
Step 4: Add artistic effect: Filter - Sketch - Photocopy Effect (adjust as desired; may need to adjust contrast on original image)
Step 5: Cut out white pixels: Use the Magic Wand to select and cut out white pixels in image
Step 6: Color: Color fill layer - Choose desired line color - Make clipping mask
Step 7: Fill: Create a new layer behind the lines, paint in with desired fill color
Step 8: Add artistic effect: Filter - Sketch - Halftone Pattern Effect (adjust as desired)
Finish: Can be printed and ironed onto a pillow, or sent to Spoonflower

A zoomed in version of the final product:


I had Mr. Made blow up my images in Illustrator (complete with cutting lines), and sent it off to Spoonflower. While I had heard a lot about the service, this was my first time using Spoonflower and I have to say that I'm impressed! For $18.75 including shipping, they printed up my exact images on a yard of fabric and had it mailed to me in under two weeks. The cotton was a bit more sheer than I had expected, but the colors were true and bright. Of course, the yardage isn't cheaper than most fabrics you can get in a fabric shop, but for a special-occasion custom print I was very happy. Including custom fabric printing, coordinating fabric, and the pillow inside each cover, the total cost for each came to less than $10 per cushion.

The pillow cases themselves are just an envelope design, meaning no zip closures (similar to this tutorial). I used the selvages so I didn't have to hem around the opening, and they came together in under an hour. 

Of course, I couldn't leave our new puppy Beatrix out of the fun (I am most definitely a crazy dog lady now). With three images for my friend, there was space for one more of B. Ours is in a black and white style that more closely fits our decor, with a black backing. I can't tell if B likes it or is just confused!


Bay Area Love

Whatever frustration I have been feeling about a certain pair of pants lately has been totally appeased by some local sewing love. Out of all the international sewists in Kestrel Makes's Spring Sewing Swap, I had the good fortune of getting paired with local Melizza of Pincushion Treats. She sent me a beautiful package of white embroidered cotton, notions, and a pincushion which I immediately put into use (my old one was soo ratty!). I have a pattern in mind already, and can't wait to meet up with her soon to show off our makes!

In other local news, this past weekend I had a chance to get together with the Bay Area Sewists for a fabric swap. The group is so fun, and I always love the chance to meet up with old friends and get to know some more of the super talented ladies out there! It's like going to a party where you can always count on the topic of conversation to be your favorite thing ever-sewing!

Back row: Sylvia, me, Leah, Lynn, Angela, Ali, Alice, Meg, Ericka, Claire,
Parish, Laura, Beth, Sara, Hillary, Charlotte, Ebony
Front row: Cassandra, Lindsay, Allison, Jilly
(with a few names missing)
Photo Courtesy of Bay Area Sewists
The swap itself was also a major success for me, as I brought a whole tub filled with things and left with just two pieces of fabric (bathing suit lycra and cotton gingham!), interfacing, and a scrap of silk for costuming


Thank you to everyone who makes this such an amazing community to be a part of!

Floral Blouse

Pattern: BurdaStyle's Printed Blouse 08/2012 #109
Fabric: 1.5 yds London Calling Lawn Deco Bloom Vintage (link may expire)
Cost: $16


How do you sew with a friend who lives 2,000 miles away?? You order up the same fabric, of course! Meli contacted me last summer about doing something fun together, and we finally decided on being fabric twinsies by buying the beautiful London Calling in Bloom Vintage from Fabric.com. Isn't it gorgeous?! The plan was to each pick our own pattern for the same fabric, and reveal the results when we were all done.

But then, after spending all summer choosing this light and airy fabric, we ended up leaving it until the Polar Vortex hit the US to sew it up. Why, of course we would need summer clothes when temperatures are dipping to negative 40 degrees across the country! Lucky for me though, Northern California is more immune to weather phenomena with ridiculous names, and it was a (relatively) balmy 52 degree morning when I snapped these photos with my jacket off. I can't say it ever got that warm for Meli... No matter, we'll just call it our early spring collection!


For my project, I wanted to balance out the bright and busy print with a simple design. I chose BurdaStyle's Printed Blouse 08/2012 #109 (which I'd had my eye on for a while) because it's a great woven top with just enough darts to provide shape. If you're anything like me, you're always on the lookout for a great blouse pattern to sew up all your beautiful cottons in!

Before starting, I stalked the other users who had made the project and decided that it did need a few modifications. For one, BurdaStyle seems to be overly fond of droopy, batwing-type sleeves, which must be popular in Europe or something. To fix this, I redrafted the armscye and sleeve head using the Scout pattern. As a I sewed, I also removed excess fabric by shortening the length and adding some additional waist shaping, making sure I could still slip it over my head. Finally, I shortened the sleeves, because 3/4 length is my favorite. The resulting blouse fits me surprisingly well, and I hope to use this pattern again sometime. Mark that as a win for BurdaStyle!


As I sewed, I listened to my some new tunes courtesy of Meli, who sent over a mix for just the purpose. Isn't she the sweetest?! The songs were upbeat and happy, perfect for this fabric. Here's happy me showing off how I get to work:


After wearing the blouse all day, it is surprisingly comfortable, and doesn't chaff mostly doesn't chaff or feel too tight, which was the bane of several of my previous attempts at woven blouses. Even Mr. K gave it the seal of approval.

The cherry on top was that I got to use my brand new camera to photograph the project at the lake. It also looks like I may have a new blog photographer! (I think he's a sucker for a nice camera...)


Thanks Meli for coordinating this great success! You can check out what she made over at Codos on the Windowsill.

Ornament Exchange - The Goods!

my mini dose of holiday cheer...
When I signed up for Kelli of True Bias's ornament exchange, I knew it would be a fun way to be sewcial, but I also realized it's a great way to start my very first ornament collection. Having moved in to my first real place with K this year, it might just be time to set up a few Christmas things of my own. Of course, I'm spending the actual Holidays with my parents, their Christmas tree, and all the bells and whistles, but it was nice to have a little something Christmas-y at ye ol' condo (even if we are currently undergoing some repairs/construction and the place is a mess!).

So, it goes without saying that I couldn't be any more grateful that my first ornaments were handmade by beautiful and talented sewing women from all around the country. I was blown away by the craftsmanship, care, and creativity that was put in to each ornament that I received. Even without a tree (or even a branch), they brightened up my little place all on their own. To see for yourself, here is a peak at the ornaments I received:


Jessica was the first to send out her ornaments, and made these adorable Christmas stockings. The hand stitching was so cute:


Next I received an ornament from Alison, a handcrafter of "trinkets, toys and treasures" who blogs at Acorn Cottage. I was blown away by her craftsmanship! I guess she's used to working with tiny things:


Erin, a fellow Bay Area sewist who blogs at Seamstress Erin, sent over this clever little tree. You can read her tutorial for how to make one here. It's made from pom pom and a cork:


Kathy, the girly sewist and photographer at The Nerdy Seamstress, made these cute little sewing machines. Look at those little buttons! My favorite part is the real thread that runs down where the needle and thread go:


Just a few days before I left for vacation, I received this precious dove from Molly, who sews for herself and dolls (cool!) on Toferet's Empty Bobbin

Plus, I have a feeling I have one more waiting for me in the mailbox from Rian, Kelli's sister who sews and blogs about her life at Trachties.


Thank you so much to all the ladies who took the time to make up these beautiful ornaments. They really brightened up my home, which otherwise is in a sad state of construction and dust right now! I hope everyone had a very merry Christmas!
Related Posts Plugin for WordPress, Blogger...