


Ever since I was a child I've hated shoe shopping. As a kid, I preferred to be barefoot and only tolerated the most comfortable of footwear. As an adult, I find that many of my favorite ballet flats rough up my heels and the ones that don't are hard to come by.
Yet for all the trouble, shoes don't seem that complicated. Don't get me wrong, there is a rich history of shoemakers and some very exquisite things on the market today. But some of my favorite shoes are simple, cheap flats without much structure or support. I wondered if I couldn't recreate a very elementary shoe to try out for myself. How amazing would it be to have properly fitting, non-chaffing shoes in whatever colors I wanted! So after years of talking about it, I have finally taken the plunge and decided to make my first pair.
I am starting this adventure by deconstructing an existing shoe. The victim is a pair of simple ballet flats that fit really well but were chewed up by the dog on one heel. I got out my scissors and seam ripper and decided to see what these shoes were all about. Here they are from the outside in:
Sole

1. Taking off the sole - The shoe had been glued to the sole and stitched. The stitching had worn out in places over time, but overall the shoe was still tightly secured to the sole.
2. Heel - The heel gave 3/8" height in the back and was sandwiched between the sole and the shoe, sanded down until it met flush at mid foot.
3. Heel padding - Under the heel was some additional cotton padding. Not much support, but interesting to note that even a little shoe like this has something.
4. Toe - The upper had been wrapped around the bottom and stitched to it, which is done best with a last. The stitches were gathered near the toe. At this point, the inside of the shoe was still completely intact.
Structure

5. Interfacing - Ripping the outer away from insole, you can tell that it is lined with an interfacing, possibly a two-sided fusible. This gives structure to the overall shoe.
6-7. The toe and heel have additional padding, which was fused between the outer and the lining. This gives the shoe the right shape and rigidity at those crucial spots.
8. There was also some additional interfacing along the inner side seam.
Details

9. More padding - There was some additional padding at the center back above the heel. The round pad was at the top of the heel, while a thin strip reinforced the back heel dart.
10. Dart - The back heel has a tiny dart for shaping. It is also pieced with a contrast color fabric.
11. The front has a notched seam allowance around the tongue so that everything lays flat. Notice also the black tape that gives some additional reinforcement at this crucial area.
12. Lining - The lining isn't turned under at all. Because it is leather and doesn't ravel, it is sewn directly to the outer. Actually, between the outer and the lining is some piping, which was bound around the outer before being sewn to the lining.
Inside

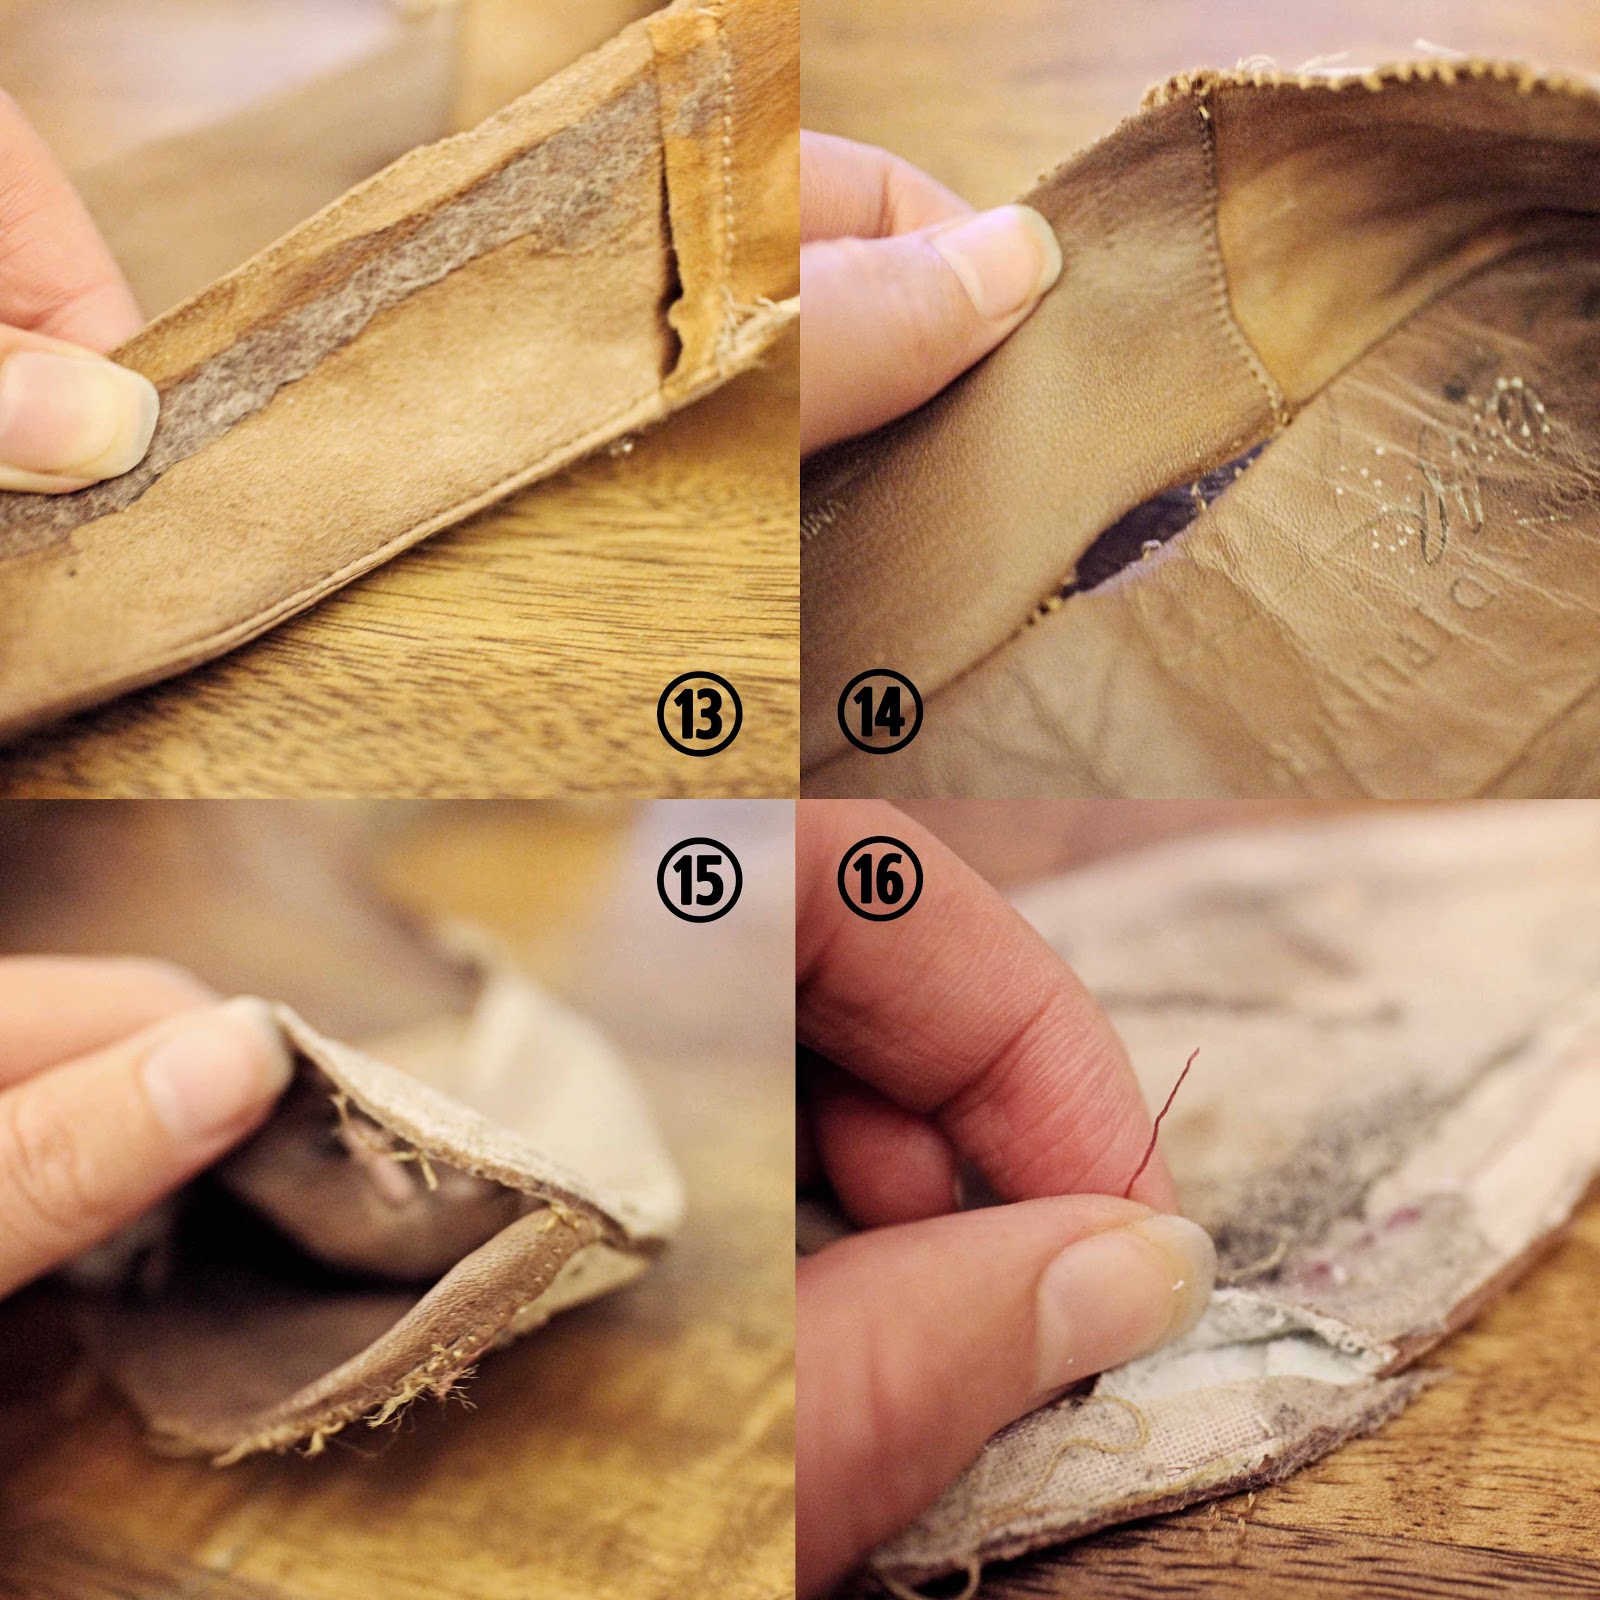
13. Insole - Once the outer is off, you can see how the lining is stitched to the insole, right sides together (seam facing the outside of the shoe). It is stitched with a very narrow seam allowance to keep everything flat.
14. Fabrics - Notice also how the lining is in two fabrics - a leather for the sides, front, and insole, and a suede for the heel. This eliminates the need for the inner side seam on the lining, which could be a nice detail for a shoe outer in the future.
15. Toe - At the toe, the insole almost wraps under towards the sole, perhaps giving the toe a nice round edge. The stitching here was very durable and I had to use a seam ripper instead of ripping the seam.
16. Insole Padding - I couldn't separate the foam padding from the lining, as it was glued together very well. Still, that extra bit of padding looks like a nice touch. In the photo, I cut into the insole slightly to see what was inside.
And here is the outer laid flat on the table over a purchased shoe pattern:

How does it compare to a purchased shoe pattern? Well, it's different. The toe is similar, but it's hard to compare the rest because the pattern has the seam at the back heel and the shoe had the seam at the inner side. Overall, however, the deconstructed shoe spreads out wider but the fabric itself is more narrow.
The whole process has been very enlightening in terms of construction and pattern. I now need to review my other research (saved here on Pinterest), and figure out how to procure the necessary materials. I also need to create a pattern from this shoe, as well as check out a purchased shoe pattern for comparison. I'll see which one I like best, take my favorite aspects from each, and sew up my first shoe. It's completely uncharted territory for me, but not impossible.
More coming soon!

Yet for all the trouble, shoes don't seem that complicated. Don't get me wrong, there is a rich history of shoemakers and some very exquisite things on the market today. But some of my favorite shoes are simple, cheap flats without much structure or support. I wondered if I couldn't recreate a very elementary shoe to try out for myself. How amazing would it be to have properly fitting, non-chaffing shoes in whatever colors I wanted! So after years of talking about it, I have finally taken the plunge and decided to make my first pair.
I am starting this adventure by deconstructing an existing shoe. The victim is a pair of simple ballet flats that fit really well but were chewed up by the dog on one heel. I got out my scissors and seam ripper and decided to see what these shoes were all about. Here they are from the outside in:
Sole

1. Taking off the sole - The shoe had been glued to the sole and stitched. The stitching had worn out in places over time, but overall the shoe was still tightly secured to the sole.
2. Heel - The heel gave 3/8" height in the back and was sandwiched between the sole and the shoe, sanded down until it met flush at mid foot.
3. Heel padding - Under the heel was some additional cotton padding. Not much support, but interesting to note that even a little shoe like this has something.
4. Toe - The upper had been wrapped around the bottom and stitched to it, which is done best with a last. The stitches were gathered near the toe. At this point, the inside of the shoe was still completely intact.
Structure

5. Interfacing - Ripping the outer away from insole, you can tell that it is lined with an interfacing, possibly a two-sided fusible. This gives structure to the overall shoe.
6-7. The toe and heel have additional padding, which was fused between the outer and the lining. This gives the shoe the right shape and rigidity at those crucial spots.
8. There was also some additional interfacing along the inner side seam.
Details

9. More padding - There was some additional padding at the center back above the heel. The round pad was at the top of the heel, while a thin strip reinforced the back heel dart.
10. Dart - The back heel has a tiny dart for shaping. It is also pieced with a contrast color fabric.
11. The front has a notched seam allowance around the tongue so that everything lays flat. Notice also the black tape that gives some additional reinforcement at this crucial area.
12. Lining - The lining isn't turned under at all. Because it is leather and doesn't ravel, it is sewn directly to the outer. Actually, between the outer and the lining is some piping, which was bound around the outer before being sewn to the lining.
Inside
13. Insole - Once the outer is off, you can see how the lining is stitched to the insole, right sides together (seam facing the outside of the shoe). It is stitched with a very narrow seam allowance to keep everything flat.
14. Fabrics - Notice also how the lining is in two fabrics - a leather for the sides, front, and insole, and a suede for the heel. This eliminates the need for the inner side seam on the lining, which could be a nice detail for a shoe outer in the future.
15. Toe - At the toe, the insole almost wraps under towards the sole, perhaps giving the toe a nice round edge. The stitching here was very durable and I had to use a seam ripper instead of ripping the seam.
16. Insole Padding - I couldn't separate the foam padding from the lining, as it was glued together very well. Still, that extra bit of padding looks like a nice touch. In the photo, I cut into the insole slightly to see what was inside.
And here is the outer laid flat on the table over a purchased shoe pattern:

How does it compare to a purchased shoe pattern? Well, it's different. The toe is similar, but it's hard to compare the rest because the pattern has the seam at the back heel and the shoe had the seam at the inner side. Overall, however, the deconstructed shoe spreads out wider but the fabric itself is more narrow.
The whole process has been very enlightening in terms of construction and pattern. I now need to review my other research (saved here on Pinterest), and figure out how to procure the necessary materials. I also need to create a pattern from this shoe, as well as check out a purchased shoe pattern for comparison. I'll see which one I like best, take my favorite aspects from each, and sew up my first shoe. It's completely uncharted territory for me, but not impossible.
More coming soon!


Brava! Thanks for such a well-documented deconstruction. I'll be cheering you on every step of the way. I want to do this too.
ReplyDeleteVancouver Barbara
What a great shoe you chose to deconstruct! Not all shoes would have all those details you've pointed out so it's a great example. When I was trying to create my own stiffeners I used Buckram (and fabric stiffener) rather than interfacing as it gave the shoe more strength and shape. I suggest you check out this website and download their free patterns: http://icanmakeshoes.com/online-learning/ The ballet flat pattern they offer is similar to what you've cut open so you can check out the shape. Keen to see what you make, shoe making is SO much fun!
ReplyDeleteThanks so much! I was hoping you'd have some advice for me ;)
DeleteI was just looking at these factory pics. Among other things, they show the way the lining is sewn on and then trimmed away. http://www.chiemihara.com/factory_pictures.html
ReplyDelete